Showing posts with label bird. Show all posts

Monday, January 23, 2012

Big Mouthed Valentine Cards - nothing says LOVE any better!

I have been really busy making up some samples from one of my newest sets: Big Mouth Valentines Digi Stamps. The monkey, lion and bird in this set all have a perfect heart shape in their mouthes...so very fun to create with! You can hand color the heart, print it on patterned cardstock and layer, glitter it, emboss it, and add shine with crystal effects. And these are perfect to use for whimsical anniversary cards or expressions of love.

I will be posting a tutorial on how to get started using digi stamps where I will share with you a sample sheet showing how I set up pages for printing and cutting that can be used over and over again. So check back to my blog later for that lesson!

This is a preview of the set showing all the verses and images that come with it. It contains the artwork in jpeg, eps and png file formats which you can place into Word documents to print out or edit in your graphics and photo editing software. Digi stamps are super easy to just printout and hand color...my favorite way to use them on projects, but there are many more ways to use them creatively so don't let that limit you.


Today, I will post a few of the Valentine Cards, but you can view more of these in the MyGrafico gallery or in my Picasa Hybrid cards gallery. There are also links to the sets underneath each image.


Lion Happy Valentine's Day Card

created with Big Mouth Valentines digi stamps
http://www.mygrafico.com/digital-stamps/big-mouth-valentines-ds/prod_6452.html and http://www.mygrafico.com/digi-tools/digital-doilies-1/prod_4219.html


Lion Square Wavy Striped Valentine's Card
Cards come in all shapes and sizes. For this one, I made it 5" x 5" square. It features the lion digi stamp from my Big Mouth Valentines Digi Stamp set: http://www.mygrafico.com/digital-stamps/big-mouth-valentines-ds/prod_6452.html 

The inside features one of the digi verses with some red glitter inside of the heart.


Bird Love You Lots Tweety Card

This card of softly layered colors with a brightly colored digi stamp makes an adorable Valentine or Anniversary card. I created it with the bird digi stamp image from my Big Mouth Valentines digi stamps set:
http://www.mygrafico.com/digital-stamps/big-mouth-valentines-ds/prod_6452.html 


A layered digi verse was used on the inside to make this into a Valentine's Card, but
this same card design could be used for anniversary or just an note of love & encouragment.


Monkey Wanna Monkey Around Card

Love this color combination I used to create this whimsical valentine card. It uses the monkey digi stamp from my Big Mouth Valentines digi stamp set.
http://www.mygrafico.com/digital-stamps/big-mouth-valentines-ds/prod_6452.html


Cardstock is from Bohemia collection, The Little Moments Dots and Doodlebug designs striped paper. Lavender and turquoise solid linen papers are from Recollections.
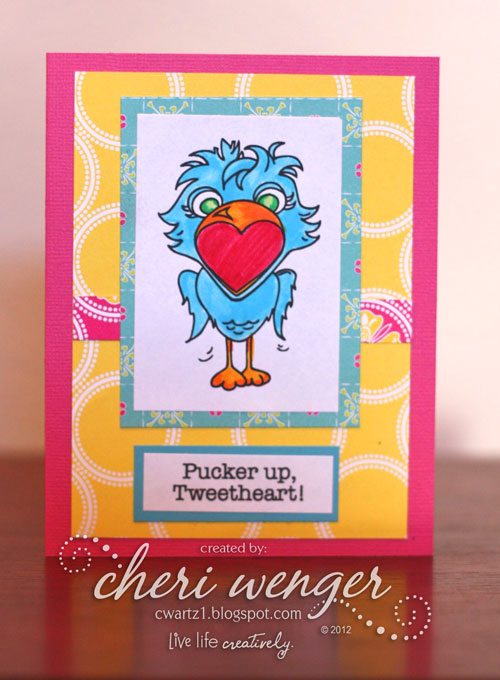


Bird Pucker Up Tweetheart Card
created with Big Mouth Valentines digi stamps
http://www.mygrafico.com/digital-stamps/big-mouth-valentines-ds/prod_6452.html


Again, to turn this one into a Valentine's card, a layered verse was added to the inside.

Thursday, March 10, 2011

Get Ready for Spring with Dollar Off Sale on my Digi Designs

Everyone loves a sale. So I have marked select sets $1 off...that is 17 - 50% off their original price. Check out all of my digital designs in my shop. Here are a few fun sets for spring that are on sale right now! If you like to design with brushes, there are plenty to choose from. I am also adding new digi stamps and svg sets, so keep checking back! Don’t see what you are looking for, leave me a comment with your requests.


And if you are looking for ideas of projects made with these sets, 
check out my mygrafico gallery of sample albums.

Hurry, the sale runs now through March 20th!

Friday, February 4, 2011

Project 365 Challenge/Days 27 to 34 - A Week of Creativity

Day 27 - Be My Valentine Card


Valentine cards don’t have to take hours to be wonderful. Here is a simple card idea created using stickers, cardstock cut outs, some ribbon, some punched decorative elements and a little bit of bling in the form of some adhesive pearls. This design can be used over and over again by switching out elements, punches, ribbons and papers of your choosing.  In my sample, I paired some reddish-brown Cardstock with wonderful papers and elements from the manufacturer Little Yellow Bicycle.

Day 28 - Cork Board Date Night Card


Wanna try a fun card idea? For this Date Night card I used paper die cut elements from Shabby Chic Crafts along with a scrap piece of cork to create a faux cork board. Try this idea with your own layered elements. I used a paper clip and stick pin to add to the stationery look with two colors of twine from the Twinery and a diecut ribbon heart strip from May Arts. This card was featured as a design team project on the Glue Arts Blog. See the link for instructions and a complete supply list.

Day 30 - Uplift Card


I used pieces from a craft I made at last year's CHA show (the butterfly) to create this inspirational card for my daughter. I love pairing brights with black and white. It gives a high contrast look. Since the butterfly had a stamped french verse, I paired it with a wheeled elegant background in Tempting Turquoise ink. I smudged black ink on the white grosgrain ribbon to make it stand out from the white cardstock and add to the vintage feel. A torn bottom edge with a strip of black glued to the inside panel makes the deckled edge stand out. Try this fun handmade embellishment - layer rhinestones over top of sequins to create your own fun bling accent! I used my Glue Glider Pro and some mini extreme adhesive squares for assembly of the pieces on this cheery card design.

Day 31 - preliminary tree art for digi set


This art shows some preliminary ideas and the evolution of the loving 
tree 2 color clip art which will be the basis of a new themed digital clip art collection.
Stay tuned for the reveal of the completed collection.


Day 32- Guess Who Card


Day 33 - The assembly of the 1st Birthday Invites


Day 34 - The Loving Tree Collection
(the finished set based on the digi art created earlier this week)


Next week's creativity will include some layouts and other crafty surprises, 
and some more digital artwork concepts, too. Please tell your friends to visit. 
I will reveal the details on MY Favorite Things Giveaway contest. 

Wednesday, January 12, 2011

Project 365/ Day 11 - Sweetness Digi Collection

You saw my sketches, my project from a couple days ago. Well, today’s challenge was to scan, perfect and put together the set to post in my shop on mygrafico.com. I hope you are ready to start creating some cute Valentines. This Sweetness Collection set has some fun images to get you started! I know they will be used in some of my upcoming Project 365 challenge projects.

Friday, May 29, 2009

May God Bless You...


I first bought this set with the intention to use it for making cards for my small Confirmation group at Church. Since then, I have discovered it can be used for so many other wonderful greetings besides the Catholic sacraments, i.e. Get Well, Thinking of You, Loss of Job, Sympathy. Since this In Color cardstock and ink will soon be retiring, I wanted to share this with you. It, too, follows the rule of my last post, White plus one color. Stamps, ribbon, embossing powder and inks from Stampin' Up! The stamp set is called Special Blessings. I used white taffeta ribbon and embossing powder. My scoring blade on my trimmer enabled me to make a smooth fold to the left of the bird stamp. I drug the edge over a VersaMark pad and embossed in white to add color and texture. I used my rectangle punch to add ribbon prior to mounting it on white layer. I used Glue Arts High Tac adhesive and a strip of ribbon adhesive for the foldover flap. The wheel is Always in Bloom. Since there is no Baja Breeze ink cartridge, I simply ran the wheel over my Baja Breeze ink pad and rolled onto card edge. Tip: Make sure you ink well so it appears evenly, and as always, begin off edge of CS and continue off top edge. I am sure you know someone who could use God's blessing today!