Showing posts with label Card. Show all posts

Sunday, June 10, 2012

Manly Cards for Any Occasion

With Father’s Day just a week away, you may be looking for some inspiration for making some masculine handcrafted cards. From an easy breezy military themed sample to feeling the coastal breezes, here are some samples to get your creative juices flowing...

For this card I wanted to do something special for my husband who is a terrific dad so I built a scene from stamps and techniques. For this I used a wave and palm tree stamp. For the sun, I used a punched circle and a sponge to define the shape then used markers to color in the sun. The sky was created using pastels. See below for some tips on creating the white ocean edge and shoreline.

Coastal Paradise Card created for Father’s Day
(but is suitable for any occasion!)


I first tore a strip of card stock to create a deckled edge. When stamping the ocean, I stamped over top of the strip to create a more natural shoreline. Then I used the same strip and a blender marker to rub some of the ink over the deckled edge it and onto the card a slight space away from the bottom of the wave. This creates the white foam area. For the sand, I used a combination of colored markers and a to create the spattered look, I used my old Stampin' Up spitzer with brush markers for the ocean spray and to give the sand it's sandy texture. 

Note: I also used Ivory naturals Cardstock as my background which already has some texture to it.

Tip: to extend the surf on each side of the palm, stamp a tree onto scrap and cut out. Use this as a mask with some temporary adhesive when stamping the waves in the background.


I wanted a softer edge, so I used my corner rounder on the 4 corners.


To finish the card, cut strips of coordinating cardstock and arrange in assorted lengths for background. I grabbed a piece of soft raffia from my scrap pile to tie around the art before mounting on the card. Being a tropical state of mind, I wanted to create another card with this palm tree image. I will also share with you my technique for creating the multi colored watercolored foliage stamped in the background along with a tip for putting coffee filters to use in your cardmaking. Read below!

Palmy Breezes Card
(another Father’s Day creation suitable for any time of year)


Creating a watercolor effect with multi-colored foliage:
Turn your rubber stamp face up and color entire image with a very light color marker. Randomly color over top with 2 - 3 other darker shades. Be sure to "clean" your brush marker off by rubbing off any of the colors it may have picked up onto some scrap paper before storing it away! Use a spray bottle of water to mist over the stamp lightly before stamping onto background. This is what gives it that watercolor, washy look.

Coffee Filters aren’t just for coffee!
Take a coffe filter and mist it with colored spray mist. I used a walnut ink on mine. Crumble and fold it, then tear of a piece of it to incorporate on your card creation.

Golden Years Birthday Card
(could also be used for Father’s Day or any occasion)


Sometimes card creating dictates trying things outside of your comfort zone or working with colors outside of your normal favorites. I created this card thanks to the extreme generosity of my stamping friend Ree Nathan, a fabulous SU demonstrator, who shared with me some of the new patterned papers, etc. from Stampin’ Up!®. I was so excited to test out the pack of In Colors and markers she gave me the day we had lunch and stamped...can’t thank her enough! I used some of those new In Color markers on the Coastal Paradise card, too! I got to play with some of the frame dies and new patterns. I wouldn’t have picked this color combination ordinarily, however I do like the end result.

Now it’s your turn...


Let’s slow things down a bit and end with an easy to make card layout. For my starting point, I merely stamped this old military theme rubber stamp into the upper area of a piece of trimmed cardstock I grabbed out of my leftovers stash. I built the card from there coordinating another patterned piece of cardstock and some solids to go with it. To complete the look, I added a pennant, a vintage gold button with thread and a Father's day stamped verse. To give it an aged feel, I sponged and dragged ink over the edges.


Military Style Father’s Day Card
(simply change out the sentiment to use for other occasions!)


Easy, Peasy, right? The rest is up to you! Happy creating and an early happy Father’s Day to all the great dads out there!

Thursday, February 23, 2012

Sending You Our Love and Support


The verse on this card reads “Sending You Our Love and Support”...a totally fitting sentiment and graphic for someone battling breast cancer. This hybrid card was creating using digital art, a digital diecut (svg art file) along with traditional stamping and floral diecuts from felt. Calling upon my favorite recipe for making cards, this card uses current digital art mixed with traditional card elements to add texture, interest and a customized card. The beauty of digi art is that you can size it down to fit exactly the size you want it. Nice, huh? Which is extra nice when you want to pair with an svg diecut frame, also sized to exactly the size I wanted. The flower diecuts are from Stampin' Up!®, Floral Fusion sizzlits die, paired with a small adhesive pearl and an SU stamped verse in pink ink. This makes for a clean, simple and cheery greeting for a friend battling a breast cancer diagnosis. 

Cancer comes in all forms and effects the lives of so many families. If you have been impacted by cancer or know someone who is beginning their journey, show your support for one of the many fundraising efforts out there. Our daughter Ashley's sorority is participating in Relay for Life in Boca Raton, FL. You can help her reach her personal fundraising goal by donating one day's lunch money, that Friday night pizza or weekend coffee or smoothie money. Every amount helps, and you can keep your donation anonymous. Click here for more information.

Monday, February 13, 2012

Colors That Will Make Your Digi Garden Smile

Anticipating the latest cool front to move on out so that we can kick start spring time, I designed this set of coral, melon, yellow and brown flowers. You can use these designs individually or in groupings for graphic design, greeting cards, invitations, birth announcements, scrapbooking and crafting. These would make beautiful embroidered designs, too!

The Fresh Florals set is a combination of loose doodles combined with softly textured edges on the solid petal shapes. Coral is a hot color trend and these designs look great on a soft yellow or solid white background for a fresh, contemporary look.

If you still need to send a Valentine card, check out the email version I created using the photo card in my Owlentines Printable card and invitation set. I just personalized by adding photos in Photoshop and our family name.

Monday, January 23, 2012

Big Mouthed Valentine Cards - nothing says LOVE any better!

I have been really busy making up some samples from one of my newest sets: Big Mouth Valentines Digi Stamps. The monkey, lion and bird in this set all have a perfect heart shape in their mouthes...so very fun to create with! You can hand color the heart, print it on patterned cardstock and layer, glitter it, emboss it, and add shine with crystal effects. And these are perfect to use for whimsical anniversary cards or expressions of love.

I will be posting a tutorial on how to get started using digi stamps where I will share with you a sample sheet showing how I set up pages for printing and cutting that can be used over and over again. So check back to my blog later for that lesson!

This is a preview of the set showing all the verses and images that come with it. It contains the artwork in jpeg, eps and png file formats which you can place into Word documents to print out or edit in your graphics and photo editing software. Digi stamps are super easy to just printout and hand color...my favorite way to use them on projects, but there are many more ways to use them creatively so don't let that limit you.


Today, I will post a few of the Valentine Cards, but you can view more of these in the MyGrafico gallery or in my Picasa Hybrid cards gallery. There are also links to the sets underneath each image.


Lion Happy Valentine's Day Card

created with Big Mouth Valentines digi stamps
http://www.mygrafico.com/digital-stamps/big-mouth-valentines-ds/prod_6452.html and http://www.mygrafico.com/digi-tools/digital-doilies-1/prod_4219.html


Lion Square Wavy Striped Valentine's Card
Cards come in all shapes and sizes. For this one, I made it 5" x 5" square. It features the lion digi stamp from my Big Mouth Valentines Digi Stamp set: http://www.mygrafico.com/digital-stamps/big-mouth-valentines-ds/prod_6452.html 

The inside features one of the digi verses with some red glitter inside of the heart.


Bird Love You Lots Tweety Card

This card of softly layered colors with a brightly colored digi stamp makes an adorable Valentine or Anniversary card. I created it with the bird digi stamp image from my Big Mouth Valentines digi stamps set:
http://www.mygrafico.com/digital-stamps/big-mouth-valentines-ds/prod_6452.html 


A layered digi verse was used on the inside to make this into a Valentine's Card, but
this same card design could be used for anniversary or just an note of love & encouragment.


Monkey Wanna Monkey Around Card

Love this color combination I used to create this whimsical valentine card. It uses the monkey digi stamp from my Big Mouth Valentines digi stamp set.
http://www.mygrafico.com/digital-stamps/big-mouth-valentines-ds/prod_6452.html


Cardstock is from Bohemia collection, The Little Moments Dots and Doodlebug designs striped paper. Lavender and turquoise solid linen papers are from Recollections.


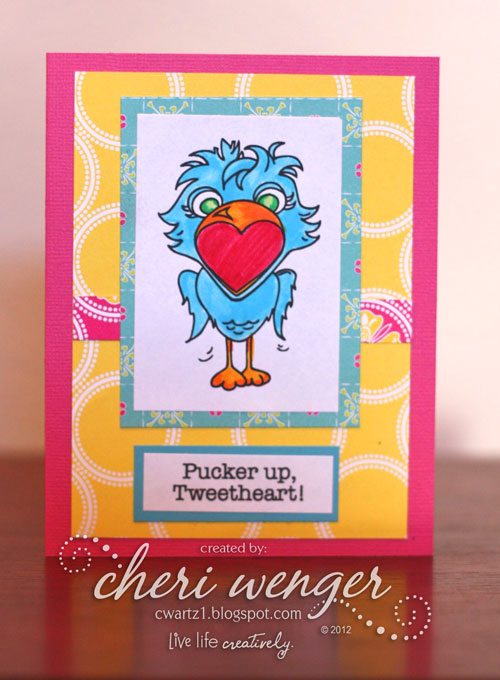
Bird Pucker Up Tweetheart Card
created with Big Mouth Valentines digi stamps
http://www.mygrafico.com/digital-stamps/big-mouth-valentines-ds/prod_6452.html


Again, to turn this one into a Valentine's card, a layered verse was added to the inside.

Tuesday, January 17, 2012

The Flight Continues

I really find it interesting knowing the story behind projects. Inspiration comes from many sources: our surroundings, personal experiences, favorite colors, images or designs, and even favorite products. These are but a few of the many things that can inspire a project. This card creation was designed to thank so many people who thoughtfully and generously reached out to our family during the loss of my mother-in-law, Jackie.

Mom’s favorite color was cobalt blue, but she just loved blue in general, so that is what I made it the main color used on this thank you note. I wanted to include some symbolism of her transition from her life here to a life in heaven. I believe this montage of butterflies does just that.

Supplies: (Stampin’ Up!®) Asstd. Blue Cardstock; Sizzlits Beautiful Wings Die; Thanks So Much verse; Finial Press Texture Embossing Plate; (Offray) Blue Satin ribbon; (Glue Arts) Extreme Adhesive Squares and Glue Glider™ Pro with high tac adhesive cartridge.

Butterflies also are a visual symbol for me of the life/death/after life transition since my uncle’s death in 2000. I would often get butterfly visits on my walks and have many other tales of this connection, too. Using a monochromatic color palette (different shades of the same color) creates a very elegant look that you can use in all your card designs. The cascading size of the butterflies adds movement and interest. This also serves to remind us that even though a loved one’s presence fades, the memories remain even though their flight continues.

I wanted to share another butterfly card created by fellow card designer, Diane Bove. She created these 3-D butterflies using a brush from my Stylish Butterflies set combined with patterned background.


Here is a preview of that set art which contains, editable eps, jpeg, png and abr (brush files).
The set contains 3 butterflies: one solid, one with transparent swirls to use over color or patterned backgrounds digitally and one butterfly with white swirls. If you use the photoshop brush file you can change the black to a color or patterned background. I will be creating some tutorials to show you how you can use digital brushes and png art in Photoshop. So check back to my blog for updates!


Let your creativity take flight with using a butterfly on your next card creation.

Tuesday, January 10, 2012

A Sale that's oh so tweet!

Today I have three tweet things to share with you...the details of my 4 day sale, a new set to reveal and a hybrid birthday card for your crafting inspiration. If you have some craft or design projects to create, now is the time to stock up on some of my digital designs while they are 30% off!


This is also the perfect time to get started making those Valentine’s cards and I have just the set to get you started. It is my latest release called Big Mouth Valentines. This is just the first of a couple Valentine sets that I am working on. Let me know what you think of it!


It retails for $4, but is also on sale in my shop at MyGrafico. You can layer the art over digitally colored and patterned papers for scrapbooking, print the b&w designs out and hand color to create fun cards or valentines. The bird, monkey and lion have hearts in their mouths which can be fun to add flocking, glitter and shine to! I hope to make up some samples soon and post here on my blog.

Here is a hybrid card created using color clip art from my Cuppy Cakes build-your-own set. It is a birthday card I made for my dad. 


 I am also including this photo of the inside of it where I also used clip art to dress it up! This is a perfect set to have for making cards for just about any occasion.

Tuesday, January 3, 2012

New year, New Inspiration!

A touch of old, a set that’s new, and a homemade gift for the Gator Fan in you! Today I am sharing with you a traditionally crafted, holiday theme thank you card made with beautifully printed CS and diecuts paired with brown inks, a stamped and punched tag and some recycled ribbon. I love these colors...so rich. And the brown ribbon makes me want to grab a milk chocolate candy...yum! This card proves that you can grab nearby papers and embellishments to create a card without a whole lot of effort. I hope it provides some inspiration for your cardmaking endeavors! Here are some photos of the inside and outside of this card creation...


Close up view of the front of the Pine Tag Thank You Card


Another view of Pine Tag Thank You Card with tag stamped and hand colored, punched and layered on gorgeous CS with brown ink added to edges to give a warm vintage feel.


This is the inside view of the Pine Tag Thank You card with Christmas theme. All of the craftiness doesn't have to end on the outside of the card. You can used your papers and borders to compliment and enhance the inside, too!


This year in Digital Design, I started off with a set geared towards a different market: embroiderers, quilters and those who love stitchery and sewing. Quilting Patterns 1 has a variety of patterns that will add beauty and style to your crafting projects. It is available for purchase at MyGrafico. com in my shop.


And my last bit of inspiration for the day is to share this handcrafted gift I made for friends of our family who are big Florida Gator Fans. They suggested I start making these to sell. What do you think?

View 1


View 2
Has an easel back so can be put on table display!


View 3
Shown hanging as artwork on a wall


I hope this kick starts your crafting for the New Year. Happy New Year! May the year ahead be filed with many blessings and hours of fruitful crafting! Remember to always live life creatively!

If you haven't checked out mygrafico.com, make it a point to do so this year. You can click here so they know I referred you! To visit my shop, you can locate me in the pull down menu in the left column under designers. Be sure to check out all the fabulous talent there!

Monday, December 19, 2011

What do Christmas, a reindeer, surfing & a mermaid have in common?

The answer is my Holideer Surfer digi stamp! Here are a few creations made using printed and handcolored images of this beachy themed Christmas digital stamp...

An oversized card
(handcolored with markers and blender pen/layored on embossed CS)


A cheery standard greeting card
(handcolored with markers/color blocking with patterned paper substituted
and a decorative border strip added to uneven fold)


A fun gift certificate/special note or gift card holder
(I used metallic gel pens on this one!)


Want to know one huge plus of working with digital stamps?
You can have it at exactly the right size needed...all you have to do is scale it and print it, then combine it with a custom verse you set up on your computer. Now that brings holiday cheer to crafting!

Wednesday, November 16, 2011

Gobble Up the Savings before Thanksgiving!

Yesterday, I shared with you some old and new sets that may spark your creativity for the holidays. Today, I bring good tidings of a pre-Thanksgiving 4-day sale. Yes, everything in my shop at 40% off!!! Time to gobble up lots of digi sets before the sale ends at midnight on the 19th.


You can check out all the creativity at MyGrafico, then locate all the products in my shop by going to the side designers pull down menu and locate Cheri Wenger. You can go through all the sets available in my shop. If you want to be part of my community, click on the mygrafico community link to go to the groups or to get inspiration from the gallery photos. You can join my group to get info on newly released sets and special info.

Want to get cool graphics for FREE to play and create wonderful things? Check out the new Brag Party group just added to the community. If you are interested in being a part of this group, email me to receive a personal invite to the group.

This fall card is an example of how you can make use of a Halloween set, Hallowettes 2, in creative ways long after the holiday has come and gone. Lesson: Don't let a set name limit your creativity or let you pass it by. Look at all the graphics included in a set and challenge yourself to use them for other occasions or purposes. If you check out the gallery for this set you will see that it comes with 4 sheets of various size leaves and 1 sheet of frames for cutting on your personal die cutting machine. For this card, I used the frame cut from grey card stock with leaves cut out from patterned and solid cardstock to make a get well card for a friend.


Wanna know how I made that crinkled leaf on this card? Keep following my blog for a tutorial!

Thursday, September 29, 2011

Anniversaries, Birthdays means Cardmaking Galore!

The other night we were discussing how there were so many kids birthdays this week which lead to the insight that these were probably to do with holiday celebrations leading up to New Year’s Eve. In glancing at my calendar I saw how far behind I am on cardmaking. My fastest solution? Use some ready made digitals or pull out some digi brushes to create fast, beautiful backgrounds in the colors of my choosing. With cooler temps promised this weekend in Florida, I chose a fall theme palette and my Au Naturale digital brushes as the basis for these designs. I also incorporated a fairly recent frame set called Frilly Frames that is so wonderful to add text and photos to. One of the birthday cards also incorporates svg diecuts from my Swirly QZs set.Here are some examples of my card creations...


Friday, July 15, 2011

Project 365 Challenge - Days 147 - 154 Seven days of Inspiration

Day 147 - Selecting, Printing & Sorting Photos
I understand that a photo of boxes of photos may not seem very creative, however, it can be a very time-consuming task going through all your digital photos and making prints for future projects and gifts. Today, I am inspiring you to make prints of your favorite pictures. Print some for yourself and others to give as gifts.

I wanted to give Ashley’s best friends, all seniors who were graduating, prints of favorite photos from their best friends photo shoot I did along with their graduation cards and other gifts. The kids all really appreciated the prints. In this day of digital where most of their images are stored in facebook albums, they liked having tangible photos that they can take with them to college and hang up in their room.

I also printed photos to make an album for Dan for Father’s Day of the girls along with sets of prints taken when family came to visit for Ashley’s graduation and Kylie’s 16 Birthday party. I was lucky enough to take advantage of 10 cent prints at Walgreens...lots of sorting, yet a creative use of time! Look for specials at Walgreens, Walmart, Shutterfly or Snapfish to save on printing your favorite digi photos.

Day 148 - Red White & Blue Graduation Card
Traditionally stamped card in red, white & blue featuring silver embossing which always add elegance to any card creation. I used silver ribbons for texture and to compliment the silver on the card.


Day 149 - Mulberry Floral Birthday Card
Digi stamps don’t always have to be printed in b&w! I colorized my Gardenia digi stamp in photoshop to match the paper, then add touches of color. I will be sharing a tutorial of how to do this soon.


The art is from my Gardenia Digi Stamp set:

Day 150 - Pastel Gardenia Birthday Card
Using the digi stamp from the same set featured yesterday, I created this hybrid card layering the b&w stamp on top of a digital paper with lace frame. The lace frame, I created using a lace strip from my Gettin’ Grungey collection. Since my mom loves lavender, I used that as my color palette and paired with the patterned paper from Basic Grey. A traditionally stamped birthday verse was added with some punched border strips and a ribbon. To achieve the soft coloring on the flower, I used chalk pastels.


Day 151- A Good Luck Grad Card Made in Minutes
What do you get when you pair a cool foil stamped piece of card stock with some DCWV cardstock, ribbon and a stamp? The answer is a card you can make in only a few minutes. Every card doesn’t have to be a masterpiece. This one proves, simple and elegant can be just as nice!


Day 152- Pulling from the Stashes to create a vintage card
This Vintage Hybrid Sympathy Card was created from elements in my digi & svg print and cut stash, a folder I keep with misc. printouts of digi art and svg cutouts for use on future cards and projects. I paired the digi stamp from my Elegant Frames set with a Swirly QZ’s dicut, some ribbon, old patterned paper, flowers, pearls and a paper butterfly diecut element to create this sympathy card for a family member.


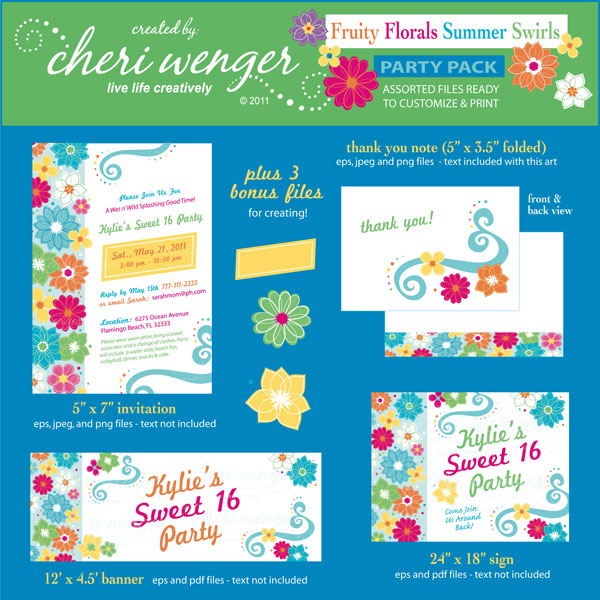
Day 153 - New Party Pack Set & samples
I designed this Fruity Floral Summer Swirls Party Pack collection, which was inspired by my ML Fruity Florals collection plus the need to design an invitation for my daughter’s 16th birthday. It evolved from that into a banner, sign (featured on days 127 - 129) and now, a thank you,  so why not put it in a collection to make someone else’s life a whole lot easier?!!!!


Day 154 - 25th Anniversary Card
Next month is mine and Dan’s 25th anniversary and knowing how time flies, I made the card back in June using more of my Swirly QZs svg diecuts and some other items from my favorite stash piles. I love this paper from the Girls Paperie...so pretty and it paired well with my polka dot silk flowers and swirl flourish. I used a brown digi printout of art from my Special Numbers collection to matt and layer on top. The oval was a saved diecut that added a matted effect when layered over the patterned paper. When embossing card stock with folders and end up with mini scraps, try layering under a stamped verse as I did in this card sample. Another tip to try is tying sheer ribbon around your background layer before mounting, then layering elements on top for a multi-dimensional card creation.


Here is a preview of the Special Numbers Collection, one of my earliest releases, an oldie but goodie!


Hope you found lots of cardmaking inspiration from this week’s flashback to my Project 365 challenge.