Showing posts with label Ree Nathan. Show all posts

Sunday, June 10, 2012

Manly Cards for Any Occasion

With Father’s Day just a week away, you may be looking for some inspiration for making some masculine handcrafted cards. From an easy breezy military themed sample to feeling the coastal breezes, here are some samples to get your creative juices flowing...

For this card I wanted to do something special for my husband who is a terrific dad so I built a scene from stamps and techniques. For this I used a wave and palm tree stamp. For the sun, I used a punched circle and a sponge to define the shape then used markers to color in the sun. The sky was created using pastels. See below for some tips on creating the white ocean edge and shoreline.

Coastal Paradise Card created for Father’s Day
(but is suitable for any occasion!)


I first tore a strip of card stock to create a deckled edge. When stamping the ocean, I stamped over top of the strip to create a more natural shoreline. Then I used the same strip and a blender marker to rub some of the ink over the deckled edge it and onto the card a slight space away from the bottom of the wave. This creates the white foam area. For the sand, I used a combination of colored markers and a to create the spattered look, I used my old Stampin' Up spitzer with brush markers for the ocean spray and to give the sand it's sandy texture. 

Note: I also used Ivory naturals Cardstock as my background which already has some texture to it.

Tip: to extend the surf on each side of the palm, stamp a tree onto scrap and cut out. Use this as a mask with some temporary adhesive when stamping the waves in the background.


I wanted a softer edge, so I used my corner rounder on the 4 corners.


To finish the card, cut strips of coordinating cardstock and arrange in assorted lengths for background. I grabbed a piece of soft raffia from my scrap pile to tie around the art before mounting on the card. Being a tropical state of mind, I wanted to create another card with this palm tree image. I will also share with you my technique for creating the multi colored watercolored foliage stamped in the background along with a tip for putting coffee filters to use in your cardmaking. Read below!

Palmy Breezes Card
(another Father’s Day creation suitable for any time of year)


Creating a watercolor effect with multi-colored foliage:
Turn your rubber stamp face up and color entire image with a very light color marker. Randomly color over top with 2 - 3 other darker shades. Be sure to "clean" your brush marker off by rubbing off any of the colors it may have picked up onto some scrap paper before storing it away! Use a spray bottle of water to mist over the stamp lightly before stamping onto background. This is what gives it that watercolor, washy look.

Coffee Filters aren’t just for coffee!
Take a coffe filter and mist it with colored spray mist. I used a walnut ink on mine. Crumble and fold it, then tear of a piece of it to incorporate on your card creation.

Golden Years Birthday Card
(could also be used for Father’s Day or any occasion)


Sometimes card creating dictates trying things outside of your comfort zone or working with colors outside of your normal favorites. I created this card thanks to the extreme generosity of my stamping friend Ree Nathan, a fabulous SU demonstrator, who shared with me some of the new patterned papers, etc. from Stampin’ Up!®. I was so excited to test out the pack of In Colors and markers she gave me the day we had lunch and stamped...can’t thank her enough! I used some of those new In Color markers on the Coastal Paradise card, too! I got to play with some of the frame dies and new patterns. I wouldn’t have picked this color combination ordinarily, however I do like the end result.

Now it’s your turn...


Let’s slow things down a bit and end with an easy to make card layout. For my starting point, I merely stamped this old military theme rubber stamp into the upper area of a piece of trimmed cardstock I grabbed out of my leftovers stash. I built the card from there coordinating another patterned piece of cardstock and some solids to go with it. To complete the look, I added a pennant, a vintage gold button with thread and a Father's day stamped verse. To give it an aged feel, I sponged and dragged ink over the edges.


Military Style Father’s Day Card
(simply change out the sentiment to use for other occasions!)


Easy, Peasy, right? The rest is up to you! Happy creating and an early happy Father’s Day to all the great dads out there!

Saturday, January 22, 2011

Project 365/Day 21 - Cardmaking with Ree

Sometimes you are lucky enough to find a friend in life who makes you feel totally appreciated, who shares a passion for the same things you do and inspires you to be a better person. This is what I have found in my friend, Ree. She is a wonderfully sweet person (who is soon to be seen on Extreme Home Makeover in February) since she volunteered to help out with a home being built in the Central Florida area. She has more energy and enthusiasm about life and stamping, and has helped build my self esteem in always crediting me as her creative mentor. Whenever we get together for a day of stamping, I always leave with a smile. We share new tips and techniques we picked up between our play dates and catch up on family and friends...isn’t that the very best of living life creatively?!!! Here is a mishmash of some of what I created. We did more talking & eating than creating, but walked away energized and inspired to try new products and techniques.

I was very anxious to try out the Springtime Vintage DSP collection and pear pizzazz seam binding ribbon that was part of the goodies she gave me for Christmas. I typically am not drawn to old fashion style papers, but wow, was I inspired the more I worked with this. And the softness of the seam binding ribbon is awesome. I insisted that she teach me how she made these incredible paper flowers on a recent project she posted. And in her truly generous spirit, she dropped what she was doing to teach me how she made them. I am a bit disappointed that after mine flattened out on the ride home, I haven't been able to restore it to quite how good it looked when I was at her house, but you get the idea. And...it was made using the 5 petal flower punch, an idea she cased on the web. Pretty easy to do, and they looks so beautiful. Not great for mailing, but excellent for hand delivered cards and gifts! Check it out...


I took some closer up photos too. It is assembled using a simple brad!
I hand cut some accent leaves from Wild Wasabi that was texturized with an embossing folder.


And here is Ree’s Beautiful Letterpress card that was my inspiration!


Here is the Vintage Love Ya Card I made at her house
using background paper from Springtime Vintage DSP from Stampin’ Up!®
and 3D stamped butterfly cut out from K&Co Que Sera Sera clear stamps.
This card features the pear pizzazz seam binding ribbon...can you say gorgeous!!!
Trust me you will love the feel of it and using it on your projects.


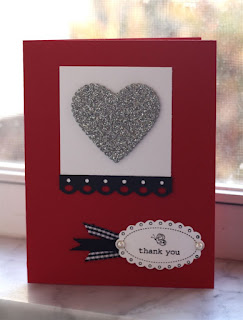
My daughter had to make a poster for a conference she was attending this weekend and we picked up some silver glittered adhesive foam for her to create the letters and graphics. She had some leftover scraps so I brought them along with me for Ree and I to play with. She ran some through the diecuts she had and I had fun using them on a couple cards. She really liked the color combination of red, black and white and silver. This could be used as a simple valentine, but I made it into a Thank You card.


I swear that this pink and black background with the canvas textured stamping strip has been in my scrap pile for several years now. I finally snagged some other scrap elements to make it into a cheery card. Don’t you just love that lil' owl. He is in one of the stamp sets (Punch Bunch) that are available for free during Sale-a-bration with a $50 purchase. So if you are needing any SU supplies, now is the time to order. I no longer am a demo, but Ree can take care of that. She has a website for doing online orders.


So, I encourage you today to surround yourself with friends who inspire you creatively and it will enhance your experience  and inspire you to live life creativley!

Thursday, January 20, 2011

Project 365/Day 17 - Craftiness from a Workshop

Check out these awesome projects designed by my Stampin’ Up! demonstrator friend, Ree Nathan. I got to enjoy my Sunday afternoon creating these wonderful projects with some super ladies. Even better, she and I are planning a follow up stamping date!


It is really a treat when I get to let someone else do all the thinking for me and all I have to do is assemble and add little touches of my creativity to a project. My note card variation came about when I punched the wrong side of the paper. I decided to try something different by adding a scrap of the red glitter paper behind the punched border. Why not, right? I had nothing to lose. Today's lesson: every project doesn't have to be perfect, and there are no mistakes — just opportunities for added creativity.

Friday, August 6, 2010

Play Dates aren’t just for kids!


I love how stamping has connected me with so many people, some of which have turned out to be my very best friends. One of these is my super talented friend, Ree Nathan, who credits me for getting her addicted to stamping. LOL! She is now my wonderfully talented and creative SU demonstrator and I am her customer...what a fun role reversal! And we always enjoy our little stamping play dates together. Who else would get so excited over a UPS box showing up with new products in it the way we do! It is so nice to have that friend to share cool tips, borrow each others goodies and inspire one another to try new things. There is nothing like a stamping buddy! 

I don’t mean to leave out any of my other stamping buddies, but today I share this creation I made at a stamp night with Ree. It was shortly after my aunt’s funeral and I was still a bit emotional and low in spirits. I stamped, I weeped, We shared and I left feeling a whole lot better than when I arrived! Above is one of the cards I made titled Tropicalflora Thanks. It features some older SU designer series papers, but I couldn't resist using them since the colors were just perfect! For the background, I used the NEW embossing folder called Elegant Lines. (Had to order that one right away since I fell in love with it, and it has so many great possibilities!) I embossed the cardstock then used my chalks in accent colors to bring out the texture and the Razzleberry Lemondade DSP (designer series papers) were diecut with my NEW Island Floral BigZ die. The verse is an OLD Thank You which is one of my favorites over the years. You can easily substitute any phrase or designer papers to remake this card for any occasion. Most importantly, plan a play date with a stampin’ friend to recharge your creativity and your spirits!

Friday, November 20, 2009

A Talented Friend


I have a wonderfully talented friend who credits me for introducing her to stamping and scrapbooking through my Stampin’ Up! demonstratorship. She has gone on to become a demonstrator also and is not only filling my shoes, but overspilling them with talent. I am finally getting caught up on posting these wonderful projects she designed for us to create at a workshop at her Stamping Oasis. One of the cards, I call Flourishing Elegance. You will know which one...it is so chic and beautiful! The second card, I called Take A Spin. It is a spinner card created using the fast and easy to use Simply Scrappin’ Stickers along with some punches and stamps. The third project, I call Twick O' Peek. It is a gorgeous Halloween box with a peek-a-boo diecut window in front. Hope these inspire you to create wonder creations based on Ree’s ideas. Click here to check out her blog.


Saturday, September 5, 2009

The Final Countdown!


Hello, Stamping/Scrapbooking Friends,

I type this post with news that is bittersweet. After almost 8 years of demonstrating for Stampin' Up!®, I am hosting my final workshop on Sept. 18, 2009. Recently, SU has revised their independent demonstrator agreement in ways that make it impossible for me to continue as a demonstrator for the company. I would no longer be able to be on design teams, design for the crafting industry or even mention any other craft products on my blog that could be perceived as promoting or marketing those products. Nor can I inlcude links to any friends blogs who sell or promote "the competition" (which includes the whole crafting industry) on their blogs. I simply find this new policy too restricting both professionally and personally, and although I still love their products, I am not willing to shut the door on other areas of creativity that I enjoy. 

So what does this mean for you? I will be hosting one last workshop on Friday, Sept. 18th, as previously mentioned and can take orders up until Sept. 30th when I will officially end my demonstratorship. I will continue to promote creativity and host events and classes, only they will also include the use of products other than Stampin' Up. I still believe strongly in their products and will switch gears to now being a customer, but I will continue to share with you the many wonderful products and manufacturers that exist in the crafting industry.

So how can you continue to be inspired and get Stampin' Up products? As many of you know, Ree Nathan has signed up as a Stampin' Up demonstrator and her wonderful talents and enthusiasm have flourished after her retirement from teaching. Ree will be your new SU demonstrator, and this will be a great thing for all. Due to my time restrictions, I wasn't able to give my SU business the full attention it deserved, however, Ree is so motivated and dedicated to sharing lots of great ideas with you. And I will be supporting her as both a mentor as well as becoming one of her customers. Bittersweet, indeed.

Please let me know if you will make it to the Final Workshop on the 18th from 6:30 - 10 pm. Also, I will be doing a Large rummage sale with a group of other crafting enthusiasts at the Indian Harbor Beach Recreation center at 1233 Yacht Club Blvd., Indian Harbor Beach, FL 32937 (located in Gleason Park) on Sturday, Sept. 12 from 9 am to noon. Spread the word to all your crafting friends. There should be some awesome deals. All of my retired merchandise will be marked at highly discounted prices