Showing posts with label hearts. Show all posts

Thursday, January 12, 2012

Another New Set that is Just toooo Tweet to miss!


I am super excited about all the new digi stamp sets I have in the works. They are filled with whimsical images that are perfect for Valentine’s Day, yet perfect for year round uses for other occasions, such as weddings, anniversaries, get well cheer, friendship and love!

Let me know what you think of my latest release, Ain’t Love Tweet! It includes mini birds that you can pair up, add to svg diecuts, combine on digital cards, print and layer and even print on patterned papers and layer for fun, colorful card designs and layouts. I would love to see what you create with these. My mind is certainly coming up with plenty of ideas. If I only had more hours in the day to create life would be perfect! 

Added bonus: this comes with a free set of .abr digital brushes and is on sale until Saturday! Hurry and buy it today!

Tuesday, February 15, 2011

Project 365 Challenge/ Day 44 - Valentine Love Folio

At first when I spied these folios in Staples, I thought about making a jumbo size card to put 
inside, but then I had a different plan in mind for my husband’s Valentine’s Day Gift. 
I still have an IOU out on that gift so I can’t share right now what I planned to put inside, 
but he is going to use it to store some assorted prints he has of the girls.  


The collage at the bottom is made up of some of the things he loves...cycling (chipboard 
from Crate Paper’s Restoration collection), Family (this stamp image and the love one 
are from K&Company Que Sera, Sera clear stamps) and the beach (a retired shell stamp, 
blender pens and markers from Stampin’ Up!® - also the embossed heart die used 
on two hearts is from SU!). I decorated the folio further using border stickers, 
CS matts and cut outs (like the pretty flower) from the beautiful papers in Crate 
Paper’s Restorations collection. For adhesive, I used my Glue Glider Pro with 
high tac adhesive along with some micro extreme adhesive squares for 
the buttons and some U Cut It foam to raise up the white heart die cut.

A closer view of the bottom stamping, die cuts, etc.


Just think of ways that you can use this same folio concept to create great gifts for 
other occasions. It would make a great teacher appreciation gift with cards or 
drawings inside from the class or it also would make for a fun way of 
presenting a gift certificate to a boss or co-worker! 


My challenge to you today is to find an ordinary office supply 
and turn it into something creative!
Live Life Creatively!

Tuesday, February 8, 2011

Project 365 Challenge/Days 37 - 39 A Whole Lotta Lovin’

Day 37—Love Birds Pink Dot Card

I recently shared with you one of my new digi  sets, The Loving Tree Collection.
 I used that set and Adobe Photoshop to create this digital card. 


Here is a preview of that set:


Day 38 — A Little Love Digi Card Freebie
Just in time for Valentine's Day this next digi card can be downloaded at:
http://www.mygrafico.com/freebies/a-little-love-square-card-freebie/prod_4426.html


Day 39 — Repurposed Packaging made into this Sweet Valentine’s Container 
featuring Glue Arts Adhesives, May Arts Ribbons and Little Yellow Bicycle collection.
Keep an eye on Glue Arts’ blog for complete list of supplies and instructions for this
eco-friendly, easy-to-make project idea.


Sunday, February 6, 2011

Project 365/ Days 35 & 36 - Digi Art & A Hybrid Card

What do you get when you combine a digi design with traditional cardmaking techniques? In this case, you get two days of creativity and one hybrid card! What I didn’t mention is that this Sweetie Gumball card uses a different digi stamp from the one I designed on day 35.

Some of you who are my facebook friends know that it is has been a rough month of January searching for answers to some health issues my daughter has been battling. They say that art can be healing, and for me, it has kept my mind focused on things other than being a worrying mother. After a rough night on Thursday and wondering which direction to turn next for answers, I woke up with a cheery little image in my mind of a bug peeking through some flowers. I know that God put that image there to help Kylie and I get through the day ahead. It was a long day at the doctors followed by barium shakes, a CT scan and some blood work. I told her I was so proud of her acing that test, as we got some fairly good news. Now we just sit back and wait on the labwork results to see if we will have more clues before going on to the next specialist. So as you view this snippet of the digi art (can't show the whole image just yet!), if you will please send up a prayer for answers and healing. We would greatly appreciate it. I spent the rest of Friday evening working late to turn my sketch into a new digi stamp. Hope you like this sneak peek.
Day 36’s project uses a couple paper and a cardstock sticker from Little Yellow Bicycle. I can't get enough of their fun collection of sweet papers and embellishments filled with hearts, cupcakes and yummylicious colors!

To create this card, I scaled the gumball machine to size I wanted to use on this standard size card. I colorized the heart in red with the I Luv You verse in black, then printed these out with some other images from the Sweetness Collection, one of my current digital collections on www.mygrafico.com. I love working with blender pens and markers which is how I colorized the heart gumball machine. Afterwards, I used some 2-way glue on top of the hearts with some iridescent glitter to sugarize them and add some sparkle. I also added some shiny framing around the heart and sweetie sticker by re-using some silver mylar cardstock that I saved from some perfume packaging. It made these two items stand out a little more. On my next card, I plan to do some silver embossing on the digi stamp to make the gumball machine extra metallic.

Friday, February 4, 2011

Project 365 Challenge/Days 27 to 34 - A Week of Creativity

Day 27 - Be My Valentine Card


Valentine cards don’t have to take hours to be wonderful. Here is a simple card idea created using stickers, cardstock cut outs, some ribbon, some punched decorative elements and a little bit of bling in the form of some adhesive pearls. This design can be used over and over again by switching out elements, punches, ribbons and papers of your choosing.  In my sample, I paired some reddish-brown Cardstock with wonderful papers and elements from the manufacturer Little Yellow Bicycle.

Day 28 - Cork Board Date Night Card


Wanna try a fun card idea? For this Date Night card I used paper die cut elements from Shabby Chic Crafts along with a scrap piece of cork to create a faux cork board. Try this idea with your own layered elements. I used a paper clip and stick pin to add to the stationery look with two colors of twine from the Twinery and a diecut ribbon heart strip from May Arts. This card was featured as a design team project on the Glue Arts Blog. See the link for instructions and a complete supply list.

Day 30 - Uplift Card


I used pieces from a craft I made at last year's CHA show (the butterfly) to create this inspirational card for my daughter. I love pairing brights with black and white. It gives a high contrast look. Since the butterfly had a stamped french verse, I paired it with a wheeled elegant background in Tempting Turquoise ink. I smudged black ink on the white grosgrain ribbon to make it stand out from the white cardstock and add to the vintage feel. A torn bottom edge with a strip of black glued to the inside panel makes the deckled edge stand out. Try this fun handmade embellishment - layer rhinestones over top of sequins to create your own fun bling accent! I used my Glue Glider Pro and some mini extreme adhesive squares for assembly of the pieces on this cheery card design.

Day 31 - preliminary tree art for digi set


This art shows some preliminary ideas and the evolution of the loving 
tree 2 color clip art which will be the basis of a new themed digital clip art collection.
Stay tuned for the reveal of the completed collection.


Day 32- Guess Who Card


Day 33 - The assembly of the 1st Birthday Invites


Day 34 - The Loving Tree Collection
(the finished set based on the digi art created earlier this week)


Next week's creativity will include some layouts and other crafty surprises, 
and some more digital artwork concepts, too. Please tell your friends to visit. 
I will reveal the details on MY Favorite Things Giveaway contest. 

Saturday, January 22, 2011

Project 365/Day 21 - Cardmaking with Ree

Sometimes you are lucky enough to find a friend in life who makes you feel totally appreciated, who shares a passion for the same things you do and inspires you to be a better person. This is what I have found in my friend, Ree. She is a wonderfully sweet person (who is soon to be seen on Extreme Home Makeover in February) since she volunteered to help out with a home being built in the Central Florida area. She has more energy and enthusiasm about life and stamping, and has helped build my self esteem in always crediting me as her creative mentor. Whenever we get together for a day of stamping, I always leave with a smile. We share new tips and techniques we picked up between our play dates and catch up on family and friends...isn’t that the very best of living life creatively?!!! Here is a mishmash of some of what I created. We did more talking & eating than creating, but walked away energized and inspired to try new products and techniques.

I was very anxious to try out the Springtime Vintage DSP collection and pear pizzazz seam binding ribbon that was part of the goodies she gave me for Christmas. I typically am not drawn to old fashion style papers, but wow, was I inspired the more I worked with this. And the softness of the seam binding ribbon is awesome. I insisted that she teach me how she made these incredible paper flowers on a recent project she posted. And in her truly generous spirit, she dropped what she was doing to teach me how she made them. I am a bit disappointed that after mine flattened out on the ride home, I haven't been able to restore it to quite how good it looked when I was at her house, but you get the idea. And...it was made using the 5 petal flower punch, an idea she cased on the web. Pretty easy to do, and they looks so beautiful. Not great for mailing, but excellent for hand delivered cards and gifts! Check it out...


I took some closer up photos too. It is assembled using a simple brad!
I hand cut some accent leaves from Wild Wasabi that was texturized with an embossing folder.


And here is Ree’s Beautiful Letterpress card that was my inspiration!


Here is the Vintage Love Ya Card I made at her house
using background paper from Springtime Vintage DSP from Stampin’ Up!®
and 3D stamped butterfly cut out from K&Co Que Sera Sera clear stamps.
This card features the pear pizzazz seam binding ribbon...can you say gorgeous!!!
Trust me you will love the feel of it and using it on your projects.


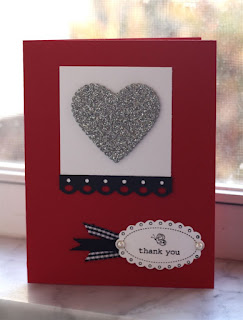
My daughter had to make a poster for a conference she was attending this weekend and we picked up some silver glittered adhesive foam for her to create the letters and graphics. She had some leftover scraps so I brought them along with me for Ree and I to play with. She ran some through the diecuts she had and I had fun using them on a couple cards. She really liked the color combination of red, black and white and silver. This could be used as a simple valentine, but I made it into a Thank You card.


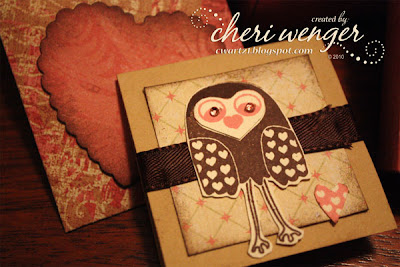
I swear that this pink and black background with the canvas textured stamping strip has been in my scrap pile for several years now. I finally snagged some other scrap elements to make it into a cheery card. Don’t you just love that lil' owl. He is in one of the stamp sets (Punch Bunch) that are available for free during Sale-a-bration with a $50 purchase. So if you are needing any SU supplies, now is the time to order. I no longer am a demo, but Ree can take care of that. She has a website for doing online orders.


So, I encourage you today to surround yourself with friends who inspire you creatively and it will enhance your experience  and inspire you to live life creativley!

Thursday, January 20, 2011

Project 365/Day 20 - Triple Heart Photo Valentine

When you get a project idea you like, why not make more, right? I have to say that my day 18 project prompted me to create more personalized photo valentines this year. This one is for my daughter Kylie. I have also really been taking advantage of rummaging through my scraps to create new cards from left over embellishments and papers. I used papers from an old Basic Grey mini stack along with some retired SU sheer organdy ribbon along with an epoxy sticker from KI Memories.

You can frame your photo, use it on a corner as I did here or punch it into a shape to add to the Valentine. I am putting my valentine’s greeting on the inside of my cards and focusing on making the outside all about the recipient. Have fun trying this...you can even make it into a mini scrapbook page!

Technique to try out: Want to create a crinkled vintage looking ribbon? Use your embossing heat tool with sheer organdy ribbon. Hold it close to the ribbon and watch it shrivel up. Don’t go too close or it will burn.

Sunday, January 9, 2011

Project 365/Day 7 - Sketches for New Digital Stamps


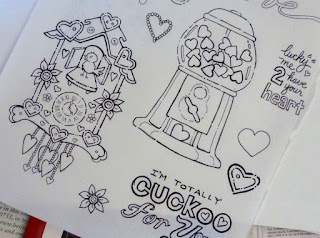
I love how in living life creatively, my projects include all the creative things I love to do — design, illustration, photography, stamping, paper crafts, etc. Day seven’s project was working on some sketches for new digital stamps. With Valentine’s approaching, I worked on some fun new hand lettered verses and images that I hope to soon add to my shop on mygrafico.com. This is a sneak preview!

Wednesday, January 5, 2011

Project 365 Challenge: Day 4/Digital Valentines

One thing I promised myself in doing this challenge is that I wouldn’t sweat it if I didn’t get to post daily each of my projects, so I apologize if I don’t always get to post my project the next day. Life & work sometimes gets in the way but I will post them as soon as possible. However, I am sticking to the challenge of finishing a new project each day. Sometimes photographing them might have to wait until the next day.

Yesterday was filled with work, a doctor’s appt. and my children’s request to watch My Sister’s Keepers together. And these were all priority over my challenge. So later last night I sat down to think about what I wanted to create. With Valentine’s Day in mind, I decided to work with my Fluidity Multi Color collection to create these digital card fronts in Adobe Illustrator.


In these, I used the colors in the set, however, you can edit the eps files 
in Illustrator to recolorize the art.These can be printed and mounted on cardstock 
or simply emailed to friends and family as an attachment.

Be My Valentine


Heart Flutter


Free My Heart

Wednesday, September 29, 2010

Out of the stash pile

Have you ever started punching a border or die cutting a design and ended up changing your mind on a color or layout? What about those times when you find the right combination of inks and stamps and decide to make a whole bunch for later....thus the creation of the infinite stash pile[zzzzz]! Some times I just can't help it when I have a certain die out, I just feel compelled to punch the design from a variety of papers to use for later. Well, I just had to prove to ya’ll that I really do use these stashed items. Hmmm, or is it that I am trying to convince myself that I really do! You figure it out! For this fast, adorable birthday card for my cousin’s daughter, I went to the stash for the patterned flower diecuts and the textured scallop heart. It is always nice to grab and go, and knock out a card in a hurry, especially when it is already late! LOL. You may recognize the paper set, a retired SU designer series set. The heart is a current Embosslits die from Stampin’ Up!® And the verse is also an SU stamp.


This next card was a belated Birthday card for a friend's special birthday, sent a wee bit late. I used some more of the stashed diecut patterned papers along with a crinkled paper border strip and a punched border to match. The verses are from the current SU set called On Your Birthday.


So if you don't already have a stash pile, get building one today and save time. Go to it for immediate inspiration on your next project and be sure to report back on your creation!

Thursday, May 20, 2010

The LOVE Bug!!!

Well if you live in Florida, you have experienced a snowfall of lovebugs swarming everywhere. It felt like a lovebug snowfall on Monday. On Tuesday, they covered our dining room window and lined the doorway. I have never experienced anything quite like this in the six years we have been here. I guess it is just nature and spring time! Funny that my latest digital product is called the
Love is Plentiful Collection
. I promise you it was named way before the love bugs arrived, but I am finding it quite ironic! LOL. Full of vibrantly colored graphics and patterned papers in some of my favorite summer colors, this collection will brighten up any card, layout or project you have in mind. Here is a peek at it...


It features 22 items: twelve 12 x 12 papers, 2 borders and 8 graphics for $7.95!
You can purchase it exclusively at Mygrafico.
I would love to feature projects you create with this collection on my blog and
will post items here and in my Mygrafico gallery once I create them.
Hope Love is Plentiful for you today and always!

Tuesday, March 2, 2010

A Card for A Craft Idol

American Idol is in full swing and it got me to thinking about how I actually got to meet and eventually become friends with one of my crafting idols, Susan Stringfellow. You see as I go go through my scrap and stamp magazines and find projects I REALLY like, I always check out who the designer is. More often than not the name was Susan Stringfellow. I was a huge, anonymous fan of her work so imagine my surprise when our worlds collided when designing for Inque Boutique. Susan and I have kept in touch and share projects and inspiration whenever we can via email and our blogs. Now the real dilmena...I wanted to send her a surprise along with a card. Talk about intimidating! I finally let go of trying to create the most fantastic Susan worthy card and sent one that reflected my style. Here is the card. I used papers from Me & My Big Ideas Sassy specialty CS pad, fiskars scallop heart punch an old hostess set of occasions verses for the greeting, flourish set from Autumn Leaves and this cool new wood mounted rubber stamp flourish from Inkadinkado that I used over top of the two side hearts. I used black and pixie pink ink from SU.


P.S. She liked the valentine surprise and the card!

Wednesday, February 24, 2010

Love, Love, Love...is meant to be shared!

O.K. remember when I told you that my family handmade me Valentine’s Day cards and I promised to share them? Well, I am coming through on that promise and posting the cards along with a few (behind the scenes) notes about them. You will be so impressed, as was I. See what can happen if you stamp enough...it eventually rubs off on the rest of the family! {big grin}

I am posting these in the order that I opened them! This first one is by my 14yo, Kai.
She stamped the top portion with a background floral stamp to create a
tone-on-tone look. She also used direct ink to paper distressing on the
type area and incorporated a punched flower and border...who says they
don’t pay attention to what you are doing. Maybe I should watch
and learn a few tips from them! Can you say talented? Is it
o.k. for me to proudly state that I’m her mom?!!


detail view of punched flower with button and stamped background...


This card is kind of a tag team effort. You see, several years ago I stamped this pretty 2 step stamping floral background for a friend’s gift. I had one long strip left and stashed it away for safe keeping to use on a special project. Truth be told, I was having a tough time parting with it!
Well, while I was cleaning out my supplies and reorganizing my studio, I put this strip into the patterned paper scraps file, and guess who quickly snatched it up — Ashley! I LOVE how she used it and LOL over the fact that I was saving it for something special, which it did turn out to be, only I wasn’t expecting to be the recipient!!!
How lucky am I that Ashley made me such a gorgeous Valentine card.

O.K., try not to get too jealous. My husband has only twice attempted to make me a card, both of which turned out great and meant so much to me. I am sure it is pretty intimidating for him in truly being out of his element (sort of like me on a bicycle, his specialty). He kept it simple and sweet. Doesn’t this rock!!! Poor sweetie discovered some little glue smears on it while we passed it around for everyone to ooh and ahh over. He was so heartbroken that it wasn’t perfect. Says who? Too me, it was perfect and appreciated more than any store bought card.

Friday, January 29, 2010

Valentine Hoot Box and Mini Card

Using my SU bitty box and envelope die with my sizzix big kick, I created this adorable gift box and card set for Valentine's Day. The owls are from Sassafras' Olivia & Pals clear stamp set, the flower petal is an older SU punch, the heart is a Marvy scallop heart punch and backround flower is also a Marvy Punch. The cardstock is a personal favorite collection called Classic K McKenna from K&Company along with Soft Vanilla from Stampin' Up!® and Tan CS from The Paper Co. Other supplies used: Brown satin ribbon, light and dark pink rhinestones, Chocolate Chip ink, Regal Rose Marker, stamping sponge (to distress edges), Glue Glider Pro with high tac adhesive, Glue Arts' ribbon adhesive and mini adhesive squares. I displayed this project at the CHA Craft SuperShow this past Saturday. This is a close up view of the gift card and box top. Scroll down for more photos.


Some design notes: I used mini adhesive squares to make & attach the ribbon loop under the punched flower. If you don't own this punch, you can substitute with a similar size flower. To create the 2 toned owl, I stamped once in chocolate chip, then once using the Regal Rose brush marker to color and stamp. I trimmed out the heart shaped face and adhered to stamped brown image. I trimmed around owl shape and mounted to layers on mini gift card. For edging on card, I used a stamping sponge dipped into ink pad. I drug along CS to distress. I freehand cut the mini pink heart from the wing portion of the owl I stamped in Regal Rose.


Don't forget to dress up the outside of the envelope. Here I used the scallop heart punch with a lightly patterned solid CS from the collection so I could write the name of the person I was giving it to inside the heart. Again, I edged in brown ink to make it pop!


This shows a view of the inside of the mini gift card with the ribbon wrapped around the inside. I added a tiny verse from a retired SU set, called Be Mine, but you can add in your own stamped verse or set up a message on your computer and print out. I edged Vanilla CS with rose marker.