Showing posts with label Valentine. Show all posts

Friday, February 17, 2012

Celebrating a late Valentine's Day...get inspired!

Since Valentine's Day fell on a weekday, it gives people carte blanche to celebrate that day, the weekend before, or the weekend after. If you are celebrating later this weekend then you may just need a little Valentine’s day inspiration. Here are ways that a I dressed up some gifts by using my clip art and hand colored printouts of my digi stamps to decorate a gift bag & make a homemade coupon...


For card ideas for guys, try a collage design with scrapbook elements...


Digi stamps give you lots of versatility. Print them and color them to coordinate with the papers and cardstock you have on hand. Then create great cards like these (made with my What a Hoot set).


This shows inside and outside views of the card...


Don’t be afraid to mix traditional and digi stamps together along with your favorite embellishments!


And now that Valentine’s Day is over, don't let the artwork from this digi stamp go to waste. It isn't just for Valentine’s Day. Use it for making cute get well messages, birthday greetings, and thank you cards, just like this... 


Whooooo knows where your creativity may lead you.
Be inspired to live life creatively!

Friday, February 3, 2012

Gift Inspiration for Valentine’s Day

Today, I discovered that one of my old craft creations was featured on tipjunkie.com as an example for a teacher’s gift idea. This made me realize that I should share some of my previous craft projects that are excellent inspiration for handmade Valentine Gifts. Although most of these can be found in my Picasa web galleries, I will save you the time in sorting through all the images...you can do that later by clicking the link above. I hope that these will be a springboard to your own creativity!


 Idea 1: Use items you have to dress up something ordinary!


Skill level: Beginner. 
I used paper flowers, buttons and ribbon to turn this dull storage box into a colorful, gift that my daughter can use to store her hair accessories or casual jewelry. All you need are some great adhesives. My suggestion: Glue Art’s extreme adhesive squares.


Skill level: Beginner.
For this second example, I purchased colorful buttons and used the same adhesive squares to dress up this ordinary lampshade. Note: Until I figured out the exact placement, I used smaller pieces of adhesive on the back of each button. I also layered some of the buttons beforehand for more color and interest.


 Idea 2: Turn an old container (candle jar with lid) into a matching gift set.


Skill level: Advanced; see suggestions for making it a beginner level project.
Using  coordinating papers, stamps and supplies, I created this gift, card & bag matching set by recycling and lidded glass candle jar, covering the sides and lid and trimming with a sweet stamped saying. If you are not good at cutting and stamping use pre-cut elements, stickers, colored chipboard embellishments, silk flowers, ribbons and rhinestones to turn this into a simpler, yet wonderful project.


Idea 3: Personalize a frame and turn it into a piece of art.


Skill level: Beginner-Intermediate
You can see some of the steps for this project in my Glue Arts Project gallery. This same project idea can be done at any skill level based upon the steps you choose to add. 

Skill level: Beginner:
You can start out by simply dressing up a purchased frame (great use for those 40% off coupons at the craft store!) along with some basic embellishments like sequins, adhesive pearls, rhinestones or gems, maybe some silk or paper flowers and some ribbon. You will also require some type of permanent adhesive that is strong enough to stay adhered, yet small enough to use on tiny items such as thin ribbon. For this I, once again, used extreme adhesive squares on the items that did not contain adhesive backing. Create a ribbon with some long tails and attach to one of the top corners and trail the tails around the frame using the small adhesive squares to create a flowy feel. Then dress up with various sizes of adhesive gems or pearls to complete your beginner level gift. The frame is now ready for a photo.

Skill level: Advanced
Now, step it up by creating artwork to go inside your frame or on top of the glass. For this example, I mounted a photo of my girls onto a piece of pink paper trimmed to fit the window of the frame. I used svg diecuts of my Lovey Dovey Brushes set of digital art to cut black vinyl to add to the top of the frame. I used adhesive alphabet letters to add the phrase Oh so tweet tot he glass and filled in the space by adding black sequins with white pearls on top. Now the top art is easy to display and clean.

Skill level: Intermediate
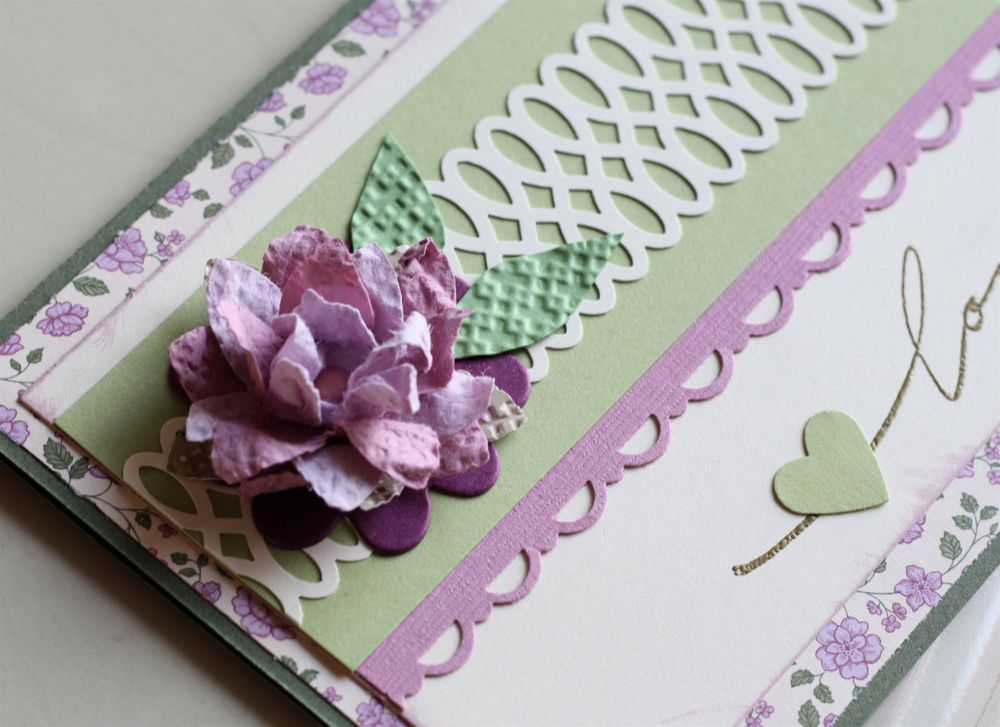
This takes a bit more time and skill, but I used some basic punches to create my own handmade, sugared flower from cardstock, glitter, a paint brush and crystal effects.  To shape the flower and folded the punched floral shape, bent and manipulated it. I used adhesive squares to attach the segments to one another to form the flower, then brushed the crystal effects onto the flower and sprinkled with dazzling diamonds glitter to give it the shimmery look. I paired with other diecut stems. You can achieve a similar look by adding pre-purchased sugared flowers from Prima. I also added a vinyl diecut heart layered onto pink cardstock on top of the ribbon. For this, you can substitute a sticker or chipboard element.


Idea 4: Transform a heart shaped craft box into a 3D display for the love of your life. 


Skill level: Advanced to Intermediate
This project started with the purchase of a kraft heart shaped box with a lid and evolved into a mini 3-D display featuring a foam core photo cut out, diecuts, trim and other embellishments. This makes a nice shelf display and also works well as an anniversary gift, especially for a special anniversary. The measuring, gluing and cutting make this a more advanced undertaking.


Idea 5: Create a relationship keepsake box. 


Skill level: Advanced
When I spotted this kraft box with a two-piece framed lid, I knew it would be fun to turn into a shadow box keepsake gift for my daughter to keep all the mementos of her high school relationship. Purchasing a themed scrapbook collection makes this project much easier due to all the great coordinating papers and embellishments that there are to use. The square lid insert became my main canvas. Tip: you may want to dray a light pencil line around the window opening of the outer lid on top of the square so you will know what are is visible once assembled. Decorate away with elements. You can even add in personal items such as ticket stubs, photo booth strips, etc. This idea can also be used as a birthday idea featuring the person's special interest i.e. a sport they play, activity i.e. theatre or dance, or a hobby they enjoy.
This sits on Kylie's shelf as room decor and a place to store notes, photos and other mementos.


Idea 6: Create a scrapbook page featuring the things or people that you love.


Skill level: Beginner-Intermediate
Beginner to Intermediate scrapbookers of all levels can create a page related to love: people they love, things they love or stories about being in love. These layouts can be framed in a 12 x 12 frame as a gift, mounted onto foam board to lean against something or given with a long piece of ribbon, some push pins and two spring-hinged clothes pins to hang on a ribbon banner on a wall.


Idea 7: Purchase a mini scrapbook album kit and 
personalize with photos, journaling & embellishements.


Skill level: Beginner-Intermediate
Even advanced crafters can make the best out of pre-made kits. As a beginner, you can simply assemble per the kit contents and instructions, or you can deviate by adding your creativity and own items to turn into a more advance project design. This was a small gift album I made for my mother, shown with photos of my sister and niece. Each page had some sweet photos that I knew she would enjoy. The finished album is pretty enough to leave out on a table top on display, and always close by to thumb through and experience a bit of family love.


Idea 8: Recycle packaging into a wonderful treat box.


Skill level: Beginner
I just love when I can recycle or repurpose things I have into wonderful gifts for friends and loved ones. This treat container was created for my niece from the empty packaging from my Glue Arts adhesive cartridges. I washed, dried then decorated it with stickers, gems and a tag. I used silk flower petals, trim and a button to make my own decorative flower. The epoxy sprinkles added a fun "sweet" element to this treat container which I filled with candies. This also makes a regiftable container for the recipient to pass along the love.


Idea 9: Cover simple boxes with stamped or diecut designs to make lovely gift boxes.


Skill level: Beginner-Advanced
As you can see, I love working with small boxes. We all have them and they come in so many fun shapes and sizes. Covering them with paint, papers, fabric, ribbons, trims and embellishments makes them that much more enjoyable to receive. Fill them with covered candies, add tissue and cookies, bath salts, packages of tea bags, cocoa, or use as an elegant way to give jewelry as a gift.


Idea 10: Dress up a store purchase.


Skill level: Beginner-Advanced
Embossing is a very elegant, yet simple crafting technique that always looks so impressive. It requires a stamp, either pigment or embossing ink pad, a heat tool and some scrap paper to recycle the unused embossing powder back into the container. For the candle wrappers, I used white embossing powder with a flourish and a heart stamp. You can take this simple candle wrapper idea to the next level and turn this into a romantic tabletop display by decorating a vase and creating a Valentine pick to put inside the vase. Ribbons, gems, floral picks, flowers, photos, etc. can be added to customize each item.

I hope that these ten Valentine Gift making ideas help you to 

Monday, February 14, 2011

Sweet Deal - 40% off Today Only on Cheri Wenger Digital Designs at MyGrafico.com

It's the perfect time to treat yourself to some crafty goodness. 40% off on everything in the MyGrafico shop today only until midnight! You can stock up on some basic brushes or svg cutting files, get a jumpstart on Spring crafts and scrapbooking or take advantage of the sale by purchasing some of my sets that have Love/Valentine's related images, such as Love is Plentiful Scrapbooking Kit, The Loving Tree color clip art, my new Sweetness Collection,  Forever in Love Flourishes, Forever in Love Style Collection, Forever in Love Frames, Fluidity brushes or Fluidity Color Clip art, Hip and Happy, Lovey Dovey clip art and brushes. You can click here to view my entire shop.

Need a fast E-Valentine or clip art to make a last minute card? Download this Cheri Wenger A Little Love digital card freebie today! Enjoy and have a happy Valentine’s Day! I will post some additional Valentine's day Project 365 creations later.

Saturday, January 22, 2011

Project 365/Day 21 - Cardmaking with Ree

Sometimes you are lucky enough to find a friend in life who makes you feel totally appreciated, who shares a passion for the same things you do and inspires you to be a better person. This is what I have found in my friend, Ree. She is a wonderfully sweet person (who is soon to be seen on Extreme Home Makeover in February) since she volunteered to help out with a home being built in the Central Florida area. She has more energy and enthusiasm about life and stamping, and has helped build my self esteem in always crediting me as her creative mentor. Whenever we get together for a day of stamping, I always leave with a smile. We share new tips and techniques we picked up between our play dates and catch up on family and friends...isn’t that the very best of living life creatively?!!! Here is a mishmash of some of what I created. We did more talking & eating than creating, but walked away energized and inspired to try new products and techniques.

I was very anxious to try out the Springtime Vintage DSP collection and pear pizzazz seam binding ribbon that was part of the goodies she gave me for Christmas. I typically am not drawn to old fashion style papers, but wow, was I inspired the more I worked with this. And the softness of the seam binding ribbon is awesome. I insisted that she teach me how she made these incredible paper flowers on a recent project she posted. And in her truly generous spirit, she dropped what she was doing to teach me how she made them. I am a bit disappointed that after mine flattened out on the ride home, I haven't been able to restore it to quite how good it looked when I was at her house, but you get the idea. And...it was made using the 5 petal flower punch, an idea she cased on the web. Pretty easy to do, and they looks so beautiful. Not great for mailing, but excellent for hand delivered cards and gifts! Check it out...


I took some closer up photos too. It is assembled using a simple brad!
I hand cut some accent leaves from Wild Wasabi that was texturized with an embossing folder.


And here is Ree’s Beautiful Letterpress card that was my inspiration!


Here is the Vintage Love Ya Card I made at her house
using background paper from Springtime Vintage DSP from Stampin’ Up!®
and 3D stamped butterfly cut out from K&Co Que Sera Sera clear stamps.
This card features the pear pizzazz seam binding ribbon...can you say gorgeous!!!
Trust me you will love the feel of it and using it on your projects.


My daughter had to make a poster for a conference she was attending this weekend and we picked up some silver glittered adhesive foam for her to create the letters and graphics. She had some leftover scraps so I brought them along with me for Ree and I to play with. She ran some through the diecuts she had and I had fun using them on a couple cards. She really liked the color combination of red, black and white and silver. This could be used as a simple valentine, but I made it into a Thank You card.


I swear that this pink and black background with the canvas textured stamping strip has been in my scrap pile for several years now. I finally snagged some other scrap elements to make it into a cheery card. Don’t you just love that lil' owl. He is in one of the stamp sets (Punch Bunch) that are available for free during Sale-a-bration with a $50 purchase. So if you are needing any SU supplies, now is the time to order. I no longer am a demo, but Ree can take care of that. She has a website for doing online orders.


So, I encourage you today to surround yourself with friends who inspire you creatively and it will enhance your experience  and inspire you to live life creativley!

Thursday, January 20, 2011

Project 365/ Day 19 - "Tweet" Photo Valentine

Some of my favorite colors are in Cosmo Cricket’s DeLovely collection so I just had to use this collection again when creating a personalized photo valentine for my daughter Ashley. The fun colorful chipboard embellishments were perfect for creating this square valentine card. I angled the striped cardstock, layered a patterned paper square on top, raised up the chick with U-cut-It double-sided adhesive foam and attached the flowers with an extreme adhesive square, both from Glue Arts. For the main assembly I used my Pro with high tac adhesive. I added my own hand-lettered verse following the same angle as the stripes. I used an old technique for adding the bow accent which involves punching two circles close together, threading the pointed ends of ribbon down through the holes and back up through the opposite hole. I fringed the ends of the ribbon for texture and added the epoxy sticker with the word glamorous.

Try making a personalized photo valentine for someone you love. I am following this same project theme on day 20’s project. Check it out!

Thursday, January 6, 2011

Project 365 Challenge: Day 5/Masculine Hybrid Valentine

For this masculine Valentine’s card, I used the Restorations Collection from Crate Paper along with buttons & gems from Bo Bunny, and Glue Arts’s high tac adhesive with Glue Glider Pro and extreme adhesive squares. Note: I used a fiskars scallop heart punch and some pink mulberry paper for the heart. The digital frame is from my Elegant Frames set. See what inspiration you can get from today’s creation.

Tuesday, February 10, 2009

Tell Your Valentine...You Rock!


Here is a fun Valentine's Treat Bag for your daughter, mom or wife. Wanna make it more manly? Change the colors to red & black and add a bandana to the skull to make more dude appropriate! (Challenge: If you try this, send me an email so I can post on the blog! Also, send me your spin on this girl version. All products available for purchase on my SU website. Plus get a FREE catalog while supplies last!)

This project uses pretty in pink, basic black, going grey and whisper white CS from Stampin’ Up.!® For the pink glitter elements, I used a marker to handcolor the hearts and as my ink for stamping the bow. I used some 2-way glue on top of those and the teeth along with dazzling diamonds to rock out this gift bag. The stamp set is Just Jawing (not just for Halloween use!!!) and Scary Skulls, both from Stampin’ Up!®. The wide ribbon is 5/8" striped Pink Pirouette and the skinnier is 1/4" pretty in pink grosgrain, also from SU. The box template is my original design. Email me if you are interested in the pattern.