

Showing posts with label Bo Bunny. Show all posts
Showing posts with label Bo Bunny. Show all posts
Thursday, January 6, 2011
Project 365 Challenge: Day 5/Masculine Hybrid Valentine
For this masculine Valentine’s card, I used the Restorations Collection from Crate Paper along with buttons & gems from Bo Bunny, and Glue Arts’s high tac adhesive with Glue Glider Pro and extreme adhesive squares. Note: I used a fiskars scallop heart punch and some pink mulberry paper for the heart. The digital frame is from my Elegant Frames set. See what inspiration you can get from today’s creation.

Thursday, November 4, 2010
How to Create a Ribbon Loopy Bow with Extreme Adhesive Squares

This Sugar & Spice layout was created in hotel room with limited supplies and tools using scissors, paper trimmer, Bo Bunny Olivia Collection cardstock & embellishments and Glue Arts ribbon adhesive, extreme mini adhesive squares along with Glue Glider™ Pro and high tac adhesive. This layout can be used as a sketch for creating simple layouts at crops or when you have limited supplies and tools at your disposal. The journaling area can be replaced with a title or a name.
Learn how to make a ribbon loopy bow following the photo tutorial below...

Unroll the liner of extreme mini adhesive squares and position end of ribbon on
top of square. Press lightly with finger to transfer adhesive to back side
of ribbon, then remove from liner.

Make loop by matching two end of ribbon and sealing together with the mini
extreme adhesive square attached in step 1.

Place ribbon loop back onto Glue Arts' extreme mini adhesive squares
liner to add another square of adhesive to ribbon

Make another ribbon loop and place one on top of the other, attaching
with the adhesive square applied in the previous step.

Create a total of 8 ribbon loops, stacking and angling each symmetrically,
and using glue Arts' extreme mini adhesive squares to layer.

Create a total of 8 ribbon loops, stacking and angling each symmetrically,
and using glue Arts' extreme mini adhesive squares to layer.

Side view of finished loopy ribbon bow with embellishments layered on top.
This bow was used as an accent on a scrapbook layout using double dot
ribbon plus stickers & cardstock from the Olivia collection from Bo Bunny
along with Glue Arts’ extreme mini adhesive squares, the Glue
Glider™ Pro and high tac adhesive.

An alternate view of the loopy bow. This shows layering with embellishments,
however, you can layer silk or paper die cut flowers or shorter ribbon
strips on top to customize your own loopy ribbon bow simply by
using your imagination and Glue Arts adhesives.
Thursday, September 30, 2010
Birthday Bliss By the Sea

Technique Spotlight:
Stamping off - create lighter shades from a colored ink by stamping image onto pad, then stamping onto a scrap sheet before stamping on project. For even lighter shades, you can stamp multiple times on scrap sheet before stamping on paper.
Dragging - to make a cardstock layer pop out without matting in a contrasting cardstock, simply drag the edges of your cardstock over an ink pad to frame it and make it stand out.
Sponging - use a sponge stamped into ink to apply light shading to cardstock or to drag around paper edges for a soft framed effect.
Wednesday, September 22, 2010
I've Been Buzzing Around Lately
As moms we typically know how to master the art of multi tasking, but during volleyball season, this skill is taken to new levels. I juggle designing, self promotions, updating my blog, creating projects, photographing and posting photos, prepping for classes, completing design team assignments, oh and in my spare time attending all my girls games, doing the usual household things, handling Team Mom responsibilities and volunteering for project Graduation Golf Tournament. Phewww! Exhausing, yes, but on some days it is very exhilarating! Last night it was laying out the graphics until 2 am to create posters for the varsity team so I can cut all the vinyl and the girls can assemble them at a team bonding get together. This is truly living life creatively to the fullest extent!
So with all this buzzing about, I wanted to make you aware of a cool new art community called CreatingTheHive.com - Arts & Crafts Community. Go check it out and you can become one of my followers or add yourself as a member. I was excited that yesterday they chose my Bleach & Embossing “how to” as a featured blog post. This was very exciting! It is a great way to meet other crafters from artists to seamstresses, from cardmakers to jewelry makers, artisans of all kind! And you may be surprised by the inspiration that you find there. You can click on the hive graphic in the right column or the link in this post.
Speaking of beeing a busy bee, I am headed to the Marriott Orlando Airport Hotel with Glue Arts to teach a 4 Seasons Canvas Display class featuring Bo Bunny’s Olivia Collection (which I love so much for its versatility) and of course my favorite adhesives from Glue Arts.


For this project I use their Glue Glider™ Pro with choice of extreme adhesive or high tac along with mini/reg. size adhesive squares. Here is a photo of the project. I am sure the instructions will soon be appearing on Glue Arts’ website. They are featured in this order: Spring, Summer, Fall then Winter.
I found the mini canvases and easels at Joanns. Right now with their coupon commotion you can get them at 40% off! The layered snowflakes are Sizzix™ diecuts. This is a fun and easy gift, great for placesettings, home decor and self promotion.

So with all this buzzing about, I wanted to make you aware of a cool new art community called CreatingTheHive.com - Arts & Crafts Community. Go check it out and you can become one of my followers or add yourself as a member. I was excited that yesterday they chose my Bleach & Embossing “how to” as a featured blog post. This was very exciting! It is a great way to meet other crafters from artists to seamstresses, from cardmakers to jewelry makers, artisans of all kind! And you may be surprised by the inspiration that you find there. You can click on the hive graphic in the right column or the link in this post.
Speaking of beeing a busy bee, I am headed to the Marriott Orlando Airport Hotel with Glue Arts to teach a 4 Seasons Canvas Display class featuring Bo Bunny’s Olivia Collection (which I love so much for its versatility) and of course my favorite adhesives from Glue Arts.
For this project I use their Glue Glider™ Pro with choice of extreme adhesive or high tac along with mini/reg. size adhesive squares. Here is a photo of the project. I am sure the instructions will soon be appearing on Glue Arts’ website. They are featured in this order: Spring, Summer, Fall then Winter.
I found the mini canvases and easels at Joanns. Right now with their coupon commotion you can get them at 40% off! The layered snowflakes are Sizzix™ diecuts. This is a fun and easy gift, great for placesettings, home decor and self promotion.

Wednesday, May 19, 2010
Hold On!!!

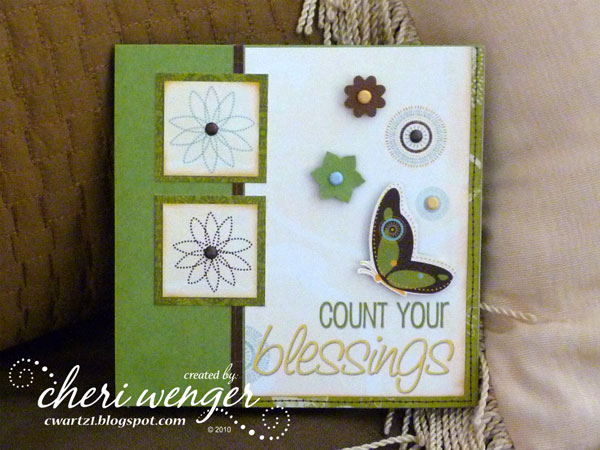

I created these using BoBunny’s beautifully patterned cardstocks from their Flutter Butter Collection along with a 2-toned brown & green CS from Coordinations’ Chocolate Box collection.

These aren't the greatest photos, since I had to rush and take them in low light before shipping off these samples for a craft tradeshow. They were used as examples for a make-n-take project at the Glue Arts booth. Don’t you just love the colors and the sayings??? It was so fun to just cut around the graphics to create these page holders. Just imagine what else you can create with this collection.

If you haven’t checked out Glue Arts site recently, they have added some new adhesive products...Raise n’s, dimenisonal double-side adhesive squares and U-Cut-It 3-D Adhesive Foam Blanks, both which work great with embellishments, especially chipboard and 3D items like flowers or frames.
Subscribe to:
Posts (Atom)