There must be something in the air because this Spring, there have been a bunch of friends and family members having babies! This put me in the cardmaking spirit, something I have missed doing lately. I grabbed the cutest little embossing folder, a gift from my stampin' buddy, Trudy, to use on some cards. Keeping in line with a current design trend to use strips of pennants as a background, I created these baby boy cards...
Baby Boy Pennant Card (for new baby)
I added two navy mini brads to the wheels of the carriage! Make this in under 5 minutes!
Baby Boy Mix Card (outside view)
Layered patterned paper pennants with buttons, polka dots and an embossed baby carriage. This card uses a mix of subtle and bold tones of red, white and blue.
(inside view)
Don't be afraid to coordinate the inside of your card with the colors,
papers and design theme used on the outside!
Embossed Carriage Card
White and Blue tones paired up with embossing adds up to an elegant looking baby card. I made this for our friend, Meghan, who recently had her third boy. To bring out the embossing more, you can dip a small piece of sponge into light or dark ink and drag over embossing. On this, I used navy ink to bring out the edges and lighter blue over top of the embossing.
Can't forget about the girlies!!!
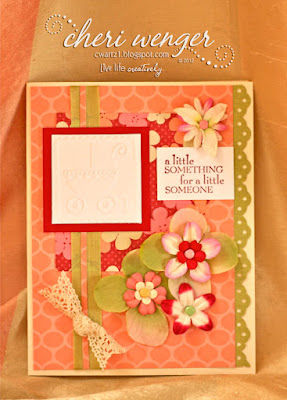
Lil' Something Card
Again, I used the same embossed carriage, except this time on a girly themed card. This was made as a congratulations for my cousin Chris and his wonderful wife, Kelly who gave birth to their second daughter, Jillian. By adding some delicate ribbons, a scalloped border and flowers paired with feminine patterned papers, you see how the overall look has changed to a girly theme.
And I couldn't forget about the big sis either!!!
New Baby Sister Card
Didn't want to leave out Brooke, the big sister, so I decided to see just what fun I could have using my owl punch from Stampin' Up!®. To recreate this card choose a couple solid shades of pink to coordinate with a sheet of pink patterned paper. You will also need a sheet of white cardstock and two shades of brown. I used a chocolately shade with a textured taupe color.
You will punch the owl once in white, once in brown and then in each of the pink papers (both solid & patterned). Mix and match the punched items to create the owls. For the diaper, you can cut by hand like I did. Or just cut the legs and top half of the body off of an owl punched from white cardstock...my delayed lightbulb moment! LOL. For the diaper pins, just snip your pieces of one of the solid pink cardstocks. For the Flowers, I used the Boho Blossoms punch and layered with some owl punch leftovers. I used rubber stamps selectively colored with a brush marker to stamp the words A, New, and Baby.
I wrote sister in my own handwriting with a pointed nib marker. By doing these on separate paper strips, I was able to trim to sizes needed and angle on the card. Congratulations was heat embossed with white powder. To make the big sis owl have a bit more interest, I used small white satin ribbon to make a bow. For the baby owl's bow, punch white paper scraps using heart from the owl punch. Combine two hearts with a tiny circle on top to form the bow.
Now that I have show you some cardmaking ideas for babies, next I will share a few cards for the moms. Check back for Mother's Day card Inspiration! Remember to Live Life Creatively!


No comments:
Post a Comment