 Carrying on with my love of the Bella Rose Designer Paper and A Happy Heart Stamp set, here is another quick card idea using Riding Hood Red ink and a Pretty in Pink marker. The white accents were done with a white gel pen. I used a 1/2" circle punch to raise up the encircled heart with Stampin’ Dimensionals adhesive foam. I used my Glue Arts® Glue Glider Pro with Perma Tac adhesive cartridge on the rest of the card. The cardstock is Real Red, Whisper White & Pretty in Pink from Stampin’ Up!®. Order these and other products on my Stampin’ Up!® website.

Friday, January 30, 2009
Love You Gingham Card
Carrying on with my love of the Bella Rose Designer Paper and A Happy Heart Stamp set, here is another quick card idea using Riding Hood Red ink and a Pretty in Pink marker. The white accents were done with a white gel pen. I used a 1/2" circle punch to raise up the encircled heart with Stampin’ Dimensionals adhesive foam. I used my Glue Arts® Glue Glider Pro with Perma Tac adhesive cartridge on the rest of the card. The cardstock is Real Red, Whisper White & Pretty in Pink from Stampin’ Up!®. Order these and other products on my Stampin’ Up!® website.
Wednesday, January 28, 2009
Love - buttoned up no more!
 I wanted to show that you don’t have to spend a lot of time to create a great card. This card is called “Buttoned Up Love”.
 Sometimes simple is good. Here I used a gorgeous red patterned paper from Stampin’ Up!®’s Bella Rose Designer Paper pack, some green galore CS for the button and Whisper White for the background and layer. Using a Pink Passion, Real Red and Green Galore marker, I colorized the wishy graphic and verse from A Happy Heart set to give a multi-color look. I worked from light to dark by coloring the Pink Passion first and adding darker red accents over top. This gives the stamping more interest. I used my Sizzix® Big Kick with the Buttons #5 die to create the paper button. I left this really plain and simple...no extra ribbons or floss, brads or other embellishments. I just let the bold colors pop. If you don't own a diecutting machine, substitute a large button in the corner. All adhesives were from Glue Arts!
So, don't be intimidated to make a card, just try something plain and simple today. You may end up loving it!
Monday, January 26, 2009
Valentine's Checkered Love Make-n-Take
 So as you can see, I have gotten into the Valentine’s spirit. I loved this new set that I purchased from Stampin’ Up!® that has so many great stamping possibilities. It is called A Happy Heart. Later this week, I will be posting some of the other card creations done with this set, if possible. ; )
Here is a peek at the Checkered Love make-n-take card done at my Stampin’ Up!® Friday night Stamper’s Club workshop. And here is a list of supplies used on this project:
Markers: Pretty in Pink & Basic Black
Designer Paper: Bella Rose
Tools: Scallop Edge Punch & 1/2" circle punch
Ribbon: Black Hemp
Adhesive: For this sample I used Glue Arts Perma Tac Adhesive with Glue Glider Pro (for my demo, I used the dotto adhesive from Stampin’ Up!). On the raised elements, I used Stampin’ Dimensionals.

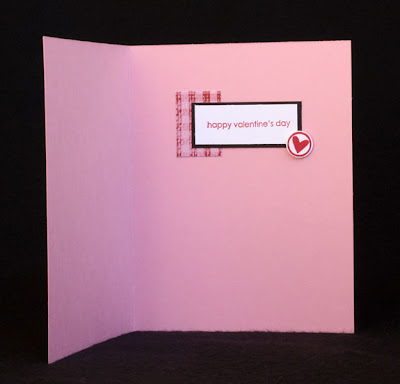
Here is a picture of the inside view and message. I carried a touch of the patterned paper to the inside along with another raised heart circle. This is actually part of a larger stamp that says i (heart in circle) u, shown at the bottom of the card above. You can use the omission technique to just stamp the heart or stamp the whole image and punch the circled heart out using a 1/2" circle punch.
Order this set on my Stampin’ Up!® website to get it in time for making your very own cards using the ideas I will be posting this week. Also, you can take a peek at the brand new Spring/Summer catalog and all of the great new products!
A Peek at the Glue Arts Display for CHA!
With Valentine’s day just a little over three weeks away, I created this poster, centerpiece and candles to showcase Glue Arts’ Wall Art Decor Adhesive at the Craft & Hobby Association Winter Trade Show, often referred to CHA. The Winter show is taking place right now in Anaheim, CA showcasing the latest product releases from Craft and Hobby manufacturers. It is a crafter’s dream to walk and observe the show. There are project samples, make-n-takes and lots of products to drool over. Can you tell that I am struggling not being there this year?


Well, even though I am not there, a bit of me is. The foam board poster shows how you can combine your own personal diecutting machines, punches, papers, Wall Art Decor Adhesive and your own creativity to decorate a room, table top or a wall for any occasion. You can customize a hallway, embellish around framed artwork or shelving and liven up a room with temporary designs using this product. This project also is great for creating school projects & posters!
For my sample, I used my QuicKutz Silhouette digital craft cutter & software along with some diecut flowers using my Sizzix Big Kick and the Flower Layers #3 die. I used papers from assorted manufacturers with coordinating colors. Here are some pictures of the items. I did also use some other Glue Arts adhesives on the centerpiece and candle wrappers.


Subscribe to:
Comments (Atom)