Showing posts with label Stampin' Up. Show all posts

Sunday, June 10, 2012

Manly Cards for Any Occasion

With Father’s Day just a week away, you may be looking for some inspiration for making some masculine handcrafted cards. From an easy breezy military themed sample to feeling the coastal breezes, here are some samples to get your creative juices flowing...

For this card I wanted to do something special for my husband who is a terrific dad so I built a scene from stamps and techniques. For this I used a wave and palm tree stamp. For the sun, I used a punched circle and a sponge to define the shape then used markers to color in the sun. The sky was created using pastels. See below for some tips on creating the white ocean edge and shoreline.

Coastal Paradise Card created for Father’s Day
(but is suitable for any occasion!)


I first tore a strip of card stock to create a deckled edge. When stamping the ocean, I stamped over top of the strip to create a more natural shoreline. Then I used the same strip and a blender marker to rub some of the ink over the deckled edge it and onto the card a slight space away from the bottom of the wave. This creates the white foam area. For the sand, I used a combination of colored markers and a to create the spattered look, I used my old Stampin' Up spitzer with brush markers for the ocean spray and to give the sand it's sandy texture. 

Note: I also used Ivory naturals Cardstock as my background which already has some texture to it.

Tip: to extend the surf on each side of the palm, stamp a tree onto scrap and cut out. Use this as a mask with some temporary adhesive when stamping the waves in the background.


I wanted a softer edge, so I used my corner rounder on the 4 corners.


To finish the card, cut strips of coordinating cardstock and arrange in assorted lengths for background. I grabbed a piece of soft raffia from my scrap pile to tie around the art before mounting on the card. Being a tropical state of mind, I wanted to create another card with this palm tree image. I will also share with you my technique for creating the multi colored watercolored foliage stamped in the background along with a tip for putting coffee filters to use in your cardmaking. Read below!

Palmy Breezes Card
(another Father’s Day creation suitable for any time of year)


Creating a watercolor effect with multi-colored foliage:
Turn your rubber stamp face up and color entire image with a very light color marker. Randomly color over top with 2 - 3 other darker shades. Be sure to "clean" your brush marker off by rubbing off any of the colors it may have picked up onto some scrap paper before storing it away! Use a spray bottle of water to mist over the stamp lightly before stamping onto background. This is what gives it that watercolor, washy look.

Coffee Filters aren’t just for coffee!
Take a coffe filter and mist it with colored spray mist. I used a walnut ink on mine. Crumble and fold it, then tear of a piece of it to incorporate on your card creation.

Golden Years Birthday Card
(could also be used for Father’s Day or any occasion)


Sometimes card creating dictates trying things outside of your comfort zone or working with colors outside of your normal favorites. I created this card thanks to the extreme generosity of my stamping friend Ree Nathan, a fabulous SU demonstrator, who shared with me some of the new patterned papers, etc. from Stampin’ Up!®. I was so excited to test out the pack of In Colors and markers she gave me the day we had lunch and stamped...can’t thank her enough! I used some of those new In Color markers on the Coastal Paradise card, too! I got to play with some of the frame dies and new patterns. I wouldn’t have picked this color combination ordinarily, however I do like the end result.

Now it’s your turn...


Let’s slow things down a bit and end with an easy to make card layout. For my starting point, I merely stamped this old military theme rubber stamp into the upper area of a piece of trimmed cardstock I grabbed out of my leftovers stash. I built the card from there coordinating another patterned piece of cardstock and some solids to go with it. To complete the look, I added a pennant, a vintage gold button with thread and a Father's day stamped verse. To give it an aged feel, I sponged and dragged ink over the edges.


Military Style Father’s Day Card
(simply change out the sentiment to use for other occasions!)


Easy, Peasy, right? The rest is up to you! Happy creating and an early happy Father’s Day to all the great dads out there!

Thursday, February 24, 2011

Project 365 Challenge/Days 49-51 What’s Swirly, Sweet & Lovely?

What’s Swirly? Day 49 brings swirly flourishes. This is a collection that I have been working on of flourish brushes and svg files. It always seems that I can never find the right flourish element when creating a card or scrapbook page, so why not create a set of my own where I can have lots of fun ones to choose from. I can’t wait to use these large scale diecut elements on layouts and smaller size on cards. I already have plans to use them on my Glue Arts design team project later this week so be sure to keep an eye on their blog.

The end result of my designing is one of my latest releases on www.mygrafico.com called Swirly QZ’s. Just imagine pairing the svg files with patterned papers, digital or traditional or using the brush art to create flourishes of any color, texture or pattern. Pair these with florals, buttons, brads and more to create your own fun card and page embellishments!


What is Sweet? On Day 50 I paired hand-cut flowers from Crate Paper’s Restoration collection CS along with one of their coordinating chipboard designs and Stampin’ Up’s 5 petal flower punch for leaves to create this Sweet Cup of Friendship card. I chose to use this background patterned paper from Stampin’ Up’s Springtime Vintage collection to compliment the florals and add a soft vintage look to this card. I distressed the edges and dragged old olive ink over them. The verse is an old favorite of mine from a retired SU set. I stamped it in the same color ink, tore the soft vanilla CS and layered over Pear Pizazz seam binding with thin pink ribbon tied over the bow. I used a small chipboard flower over top of the verse and ribbon and finished off this card with a little rhinestone bling added to some of the flowers. I used my Glue Glider Pro with high tac adhesive for adhering most of the layers and used raise 'ns to pop up and add dimension to some of the flower bouquet.


What is lovely? On day 51, I created this Whole Lotta Love Card using paper leftovers from my keepsake box project featuring Fancy Pants Designs Love Birds cardstock. I used some diecut circle leftovers to create the layered paper flower with button. You may recognize the twine I threaded though the button on top of this card. It is from the Twinery. I tied a bow, then snipped the loops and trimmed the ends to create this feathery, bow. For fast card creations, you can use patterned papers like this one to cut out verses, phrases or to use as an overall background. Easy to create in a few minutes and perfect for any occasion you want to send someone you love a card.

Wednesday, February 23, 2011

Celebrate Life...here and gone

Today is a bittersweet kind of day. It was my Aunt Floss’s birthday, and is now her granddaughter, Brooke’s. I feel a bit of sadness being reminded that my wonderful aunt isn’t here with us, but her spirit and memory lives in my heart. And the joy of the day is that Brooke celebrates her very first birthday. You may have remembered me working on her birthday invitations. Well now that they are all mailed out and her party is this weekend, I can finally share with you the labors of love put in to creating these cards. The final version includes an embossed CS layer, many punched items, rhinestone flames on the candle with glitter glue sprinkles on top of the cupcake. If you scroll down you can see how I coordinated the invitations and envelopes to go with the party goods that Kelly selected.


Happy 1st Birthday, beautiful Brooke!

Friday, February 18, 2011

Project 365 Challenge/Days 45-47 Photos & Flowery Sympathy

Some more daily doses of inspiration... I am getting caught up on photographing and posting some of my daily project challenges. Day 45 was a struggle in trying to get good digital photos at a volleyball tournament with very low lighting and no tripod or use of my flash. I just eye spied in a magazine a new gizmo...a tripod that fits onto a water bottle. That may just be an investment for an upcoming tournament. So, as it sometimes goes...you take a whole lotta shots just to get a couple good ones. In this case, this was my only real favorite from the bunch...of one of my daughter's friends (aka, one of my adopted daughters) right before she was ready to serve.


Day 46 - Flowery Sympathy Card

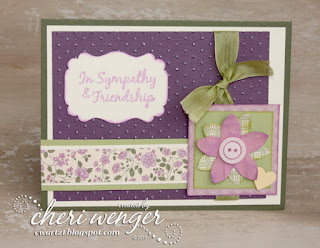
It is funny  how in life God brings you different people and different experiences that forever change your life. We have been going to the same Life Teen mass for several years and have shared the same pew with this sweet elderly couple. As time passed we got to know them a little better. Ginny was suffering for throat cancer and has been gradually losing her battle for the past year. They are a couple who remind Dan and I of one another in height and stature. Walter is real tall and slim and Virginia is short like me and petite. They don’t have any children or local family so we bring them soup and other meals when I make them up. We also invited them for Christmas dinner, but they both came down sick and weren't able to attend. Well sadly, the day after Valentine’s Day, Ginny slipped away from Walter’s caring hands in to those of the Lord. Our hearts are saddened however we know she is at peace now. I made this card to send to Walter to let him know that we are here for him and our friendship will continue. Her services are being held in Indiana so we have no way to formally say our goodbyes. Making this card with Ginny in mind made me feel just a little better, as creating always does!


inside view...


Day 47/ Sweet Floral Sympathy

It seems that death comes in pairs or trios. Just as I finished making one sympathy card, I found the need to make one to comfort another friend who was dealing with the surprising loss of her stepdad, Jim. 
I really liked the color combinations I used on the other card, so I introduced a deeper linen CS with embossing to make this card for her. Check out my Picasa gallery for supplies.


inside view...


Although I don't have formal sketches for these cards, you can use these basic layouts 
mixed with your favorite ribbons, CS, papers, stamps and embellishments to create
lots and lots of cards for any occasion. Hope this weekend, you live life creatively!

Monday, January 31, 2011

Project 365 Challenge - Day 23/ Lots of Catching Up!

Sorry for the long delay in posts, but this past week was a bit overwhelming in many areas of my life. I did manage to do something creative each day, however, it is taking me a little bit to get it posted to share with all of you.

My day 23 project has actually been an ongoing (almost daily) project...a top secret design of a 1st birthday invitation for my cousin’s little girl, Brooke. I can only post a snippet of the project not to spoil the whole surprise. The reason I chose today is because this is the day we finalized the papers, colors, etc. The theme is cupcakes!

Saturday, January 22, 2011

Project 365/Day 21 - Cardmaking with Ree

Sometimes you are lucky enough to find a friend in life who makes you feel totally appreciated, who shares a passion for the same things you do and inspires you to be a better person. This is what I have found in my friend, Ree. She is a wonderfully sweet person (who is soon to be seen on Extreme Home Makeover in February) since she volunteered to help out with a home being built in the Central Florida area. She has more energy and enthusiasm about life and stamping, and has helped build my self esteem in always crediting me as her creative mentor. Whenever we get together for a day of stamping, I always leave with a smile. We share new tips and techniques we picked up between our play dates and catch up on family and friends...isn’t that the very best of living life creatively?!!! Here is a mishmash of some of what I created. We did more talking & eating than creating, but walked away energized and inspired to try new products and techniques.

I was very anxious to try out the Springtime Vintage DSP collection and pear pizzazz seam binding ribbon that was part of the goodies she gave me for Christmas. I typically am not drawn to old fashion style papers, but wow, was I inspired the more I worked with this. And the softness of the seam binding ribbon is awesome. I insisted that she teach me how she made these incredible paper flowers on a recent project she posted. And in her truly generous spirit, she dropped what she was doing to teach me how she made them. I am a bit disappointed that after mine flattened out on the ride home, I haven't been able to restore it to quite how good it looked when I was at her house, but you get the idea. And...it was made using the 5 petal flower punch, an idea she cased on the web. Pretty easy to do, and they looks so beautiful. Not great for mailing, but excellent for hand delivered cards and gifts! Check it out...


I took some closer up photos too. It is assembled using a simple brad!
I hand cut some accent leaves from Wild Wasabi that was texturized with an embossing folder.


And here is Ree’s Beautiful Letterpress card that was my inspiration!


Here is the Vintage Love Ya Card I made at her house
using background paper from Springtime Vintage DSP from Stampin’ Up!®
and 3D stamped butterfly cut out from K&Co Que Sera Sera clear stamps.
This card features the pear pizzazz seam binding ribbon...can you say gorgeous!!!
Trust me you will love the feel of it and using it on your projects.


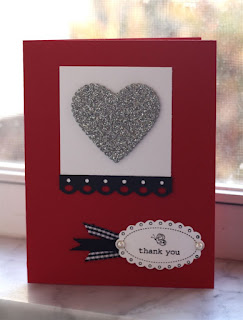
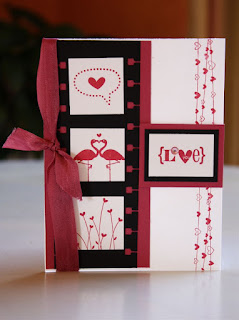
My daughter had to make a poster for a conference she was attending this weekend and we picked up some silver glittered adhesive foam for her to create the letters and graphics. She had some leftover scraps so I brought them along with me for Ree and I to play with. She ran some through the diecuts she had and I had fun using them on a couple cards. She really liked the color combination of red, black and white and silver. This could be used as a simple valentine, but I made it into a Thank You card.


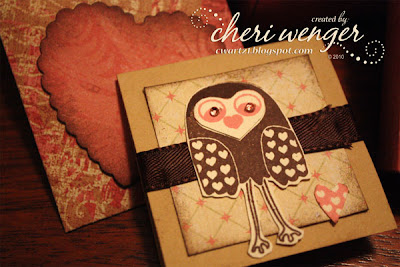
I swear that this pink and black background with the canvas textured stamping strip has been in my scrap pile for several years now. I finally snagged some other scrap elements to make it into a cheery card. Don’t you just love that lil' owl. He is in one of the stamp sets (Punch Bunch) that are available for free during Sale-a-bration with a $50 purchase. So if you are needing any SU supplies, now is the time to order. I no longer am a demo, but Ree can take care of that. She has a website for doing online orders.


So, I encourage you today to surround yourself with friends who inspire you creatively and it will enhance your experience  and inspire you to live life creativley!

Thursday, January 20, 2011

Project 365/Day 17 - Craftiness from a Workshop

Check out these awesome projects designed by my Stampin’ Up! demonstrator friend, Ree Nathan. I got to enjoy my Sunday afternoon creating these wonderful projects with some super ladies. Even better, she and I are planning a follow up stamping date!


It is really a treat when I get to let someone else do all the thinking for me and all I have to do is assemble and add little touches of my creativity to a project. My note card variation came about when I punched the wrong side of the paper. I decided to try something different by adding a scrap of the red glitter paper behind the punched border. Why not, right? I had nothing to lose. Today's lesson: every project doesn't have to be perfect, and there are no mistakes — just opportunities for added creativity.

Thursday, September 30, 2010

Birthday Bliss By the Sea

With all the recent tropical storms, the ocean has been a bit choppy and at times a surfer’s paradise. It reminded me of this recent birthday card I created using a color palette of two bright colors mixed with a neutral. The beige tone ink is Sahara Sand, the polka dot 5/8" grograin is from Bo Bunny’s Double Dot collection. The color is coffee. The blue ink is Pacifi Point and I used the stamping off technique to get lighter waves in back. The red ink is Poppy Parade and the two stamp sets are Just Surf and Birthday Bliss. All inks and Stamps are from Stampin’ Up!®. The red patterned paper is from Cosmo Cricket’s Garden Variety collection. It is the opposite side of Tossed Salad Cardstock sheet. The Royal Blue cardstock is from The Paper Company. I used dimensional adhesive foam and the Glue Glider Pro with high tac adhesive from Glue Arts.

Technique Spotlight:
Stamping off - create lighter shades from a colored ink by stamping image onto pad, then stamping onto a scrap sheet before stamping on project. For even lighter shades, you can stamp multiple times on scrap sheet before stamping on paper.
Dragging - to make a cardstock layer pop out without matting in a contrasting cardstock, simply drag the edges of your cardstock over an ink pad to frame it and make it stand out.
Sponging - use a sponge stamped into ink to apply light shading to cardstock or to drag around paper edges for a soft framed effect.

Wednesday, September 29, 2010

Out of the stash pile

Have you ever started punching a border or die cutting a design and ended up changing your mind on a color or layout? What about those times when you find the right combination of inks and stamps and decide to make a whole bunch for later....thus the creation of the infinite stash pile[zzzzz]! Some times I just can't help it when I have a certain die out, I just feel compelled to punch the design from a variety of papers to use for later. Well, I just had to prove to ya’ll that I really do use these stashed items. Hmmm, or is it that I am trying to convince myself that I really do! You figure it out! For this fast, adorable birthday card for my cousin’s daughter, I went to the stash for the patterned flower diecuts and the textured scallop heart. It is always nice to grab and go, and knock out a card in a hurry, especially when it is already late! LOL. You may recognize the paper set, a retired SU designer series set. The heart is a current Embosslits die from Stampin’ Up!® And the verse is also an SU stamp.


This next card was a belated Birthday card for a friend's special birthday, sent a wee bit late. I used some more of the stashed diecut patterned papers along with a crinkled paper border strip and a punched border to match. The verses are from the current SU set called On Your Birthday.


So if you don't already have a stash pile, get building one today and save time. Go to it for immediate inspiration on your next project and be sure to report back on your creation!

Friday, September 10, 2010

TGIF...come on and do the Glue Arts Blog Hop!

Welcome new visitors to my lilypad! As you hop from blog to blog on the Glue Arts blog hop,  you increase your chances to win a Glue Glider™ Pro and a cartridge of your choice by leaving a comment on each one of the design team members’ blogs. Be sure to sign up as a follower of these great blogs for tips and inspiration using your favorite adhesives and craft products.


If you would like to start at the beginning of the hop, click here to visit Kris Swain’s blog. From there, you can follow the links to visit each of our blogs. Get inspired by the talented ladies on the New Glue Arts Design Team and keep track of who the 4 new design team members are. You can have an added chance to win a Pro, cartridge and some Extreme Adhesive squares by emailing those 4 names to gluegirl@gluearts.com. Be sure to leave your comments by Sunday, Sept. 12, 2010. All winners will be announced on Monday.

Now for a little bit of creativity using my Glue Arts adhesives... 
You may remember my Glue Arts Wall Display layout for CHA. Well, I had one of the embossed canvas squares left over and used it as inspiration for this get well card for a friend.  For most of the layers, I used my Glue Glider™ Pro with high tac adhesive. I even used that on the leafy diecut. Here’s a Tip: place a piece of scrap paper under the diecut, run glue glider with high tac adhesive cartridge over top and apply to project. Throw away scrap sheet so you don’t transfer excess adhesive to project.
Butterfly stamps are from K&Co Que Sera Sera clear stamp set. Corner rounder & oval scallop punches and leaves and floral fusion dies are all from Stampin’ Up!®. Embossed image is an embossing folder from Cuttlebug. Adhesive pearls are Recollections line from Michaels.


Be sure to sign up to follow my blog for more exciting project inspirations and crafty goodness! Thanks for visiting and leaving a comment.
Hop on over to the talented Linda Albrecht's blog,
the final stop on the Glue Arts blog hop.

Friday, August 6, 2010

Play Dates aren’t just for kids!


I love how stamping has connected me with so many people, some of which have turned out to be my very best friends. One of these is my super talented friend, Ree Nathan, who credits me for getting her addicted to stamping. LOL! She is now my wonderfully talented and creative SU demonstrator and I am her customer...what a fun role reversal! And we always enjoy our little stamping play dates together. Who else would get so excited over a UPS box showing up with new products in it the way we do! It is so nice to have that friend to share cool tips, borrow each others goodies and inspire one another to try new things. There is nothing like a stamping buddy! 

I don’t mean to leave out any of my other stamping buddies, but today I share this creation I made at a stamp night with Ree. It was shortly after my aunt’s funeral and I was still a bit emotional and low in spirits. I stamped, I weeped, We shared and I left feeling a whole lot better than when I arrived! Above is one of the cards I made titled Tropicalflora Thanks. It features some older SU designer series papers, but I couldn't resist using them since the colors were just perfect! For the background, I used the NEW embossing folder called Elegant Lines. (Had to order that one right away since I fell in love with it, and it has so many great possibilities!) I embossed the cardstock then used my chalks in accent colors to bring out the texture and the Razzleberry Lemondade DSP (designer series papers) were diecut with my NEW Island Floral BigZ die. The verse is an OLD Thank You which is one of my favorites over the years. You can easily substitute any phrase or designer papers to remake this card for any occasion. Most importantly, plan a play date with a stampin’ friend to recharge your creativity and your spirits!

Friday, July 16, 2010

Beachy Grad Wishes

I know this post comes a bit late, but with my schedule lately, I haven't had much time to take photos of all my projects, format and upload. I am working on catching you up on some of my recent creations! Just wanted to share this graduation card/giftcard idea that I made for a friend who graduated recently. The concept can be used for any card & gift giving occasion.

outside view


full inside view (with gift card holder on left)


close up of gift card holder- showing gift card inside

You can size the gift card wrapper to whatever size you want to accommodate the store’s holder or you can take the gift card off the original holder and use temporary adhesive to attach it. Design note: I used up some left over scraps of patterned paper with some of my circle punches. The shells are from a retired SU set, which it still is one of my favorites. Today's challenge: Try making a card or scrapbook page using up a bunch of your old scraps!

Friday, April 23, 2010

This snake is cramping my style!


For those of you who don’t know this about me, I HATE SNAKES! My sister and I have had a big fear of snakes since we were little. I have gotten over my phobia a little and can tolerate worms and tiny snakes...under 12 inches. We have had to evict a couple of those from our lanai and garden, however, when they are as big around as a hose...I can’t handle that, even if they are good for the garden and non-venomous. Yesterday, on Earth Day, I was watering my garden and potted plants when I spotted this big black snake lying in the Plumbago bush under my daughter’s bedroom window. I was wanting to get the garden spiffed up for prom pics this weekend and this darn snake spoiled my plans. I squirted him with the hose and he quickly disappeared. The problem is...where did he go? I kept squirting the hose, but couldn't seem to chase him out of hiding so I went back out today, and guess where he is? On top of the next bush, sunning himself. So I sicked my husband on him, who said, “He looks friendly!” And I responded, “I don’t care, friendly or not, I hate snakes and want him out of there!” So he agreed to remove him, but when he got a couple inches away, the snake slithered away and Dan ended up with a handful of leaves, and still no snake! He observed the same thing. He seemed to have disappeared into thin air. I suspect he is hiding under the AC unit and of course that is where all the weeds are that I need to remove. GRRRR! Doesn't this snake know I have prom pictures to take and a garden to whip back in shape, and that my schedule can’t revolve around his tanning sessions!!! This snake is cramping my style!

I thought about what card to post. Right now I don't have any good flowery theme ones, but this skull and cross bones seems to fit. You know that I don’t REALLY want the snake dead, just sunbathing in someone else’s garden!

This features skull stamp & Cardstock from SU, embossed
background from Cuttlebug, Fiskars border and Uptown Houndstooth
Digital Paper from Lindsay’s Stamp Stuff found at mygrafico.com.

Monday, March 8, 2010

Walking on Sunshine

I just got back from a walk in the sunshine, yes sunshine and warmth has finally returned to Florida today and I can't tell you how glad we all are to see it. This is the weather we truly love and miss. So I went through some of my project files to dig up a bright, cheerful card to post in honor of the bright, cheery weather.

In this “Wow, thanks!” card I chose a 3 color plus white combination of only orange, tempting turquoise and orchid opulence. The stamp set is Wow Flowers set also from Stampin’ Up¡®. This is a very simple and clean layered card to make. I also used a felt flower, brad along with a circle and scallop circle punch for the framed accents. I used my Glue Glider™ Pro with PermaTac adhesive for main parts and a few dimensionals to raise up circle area. (Be sure to stamp first before adding dimension or you won’t get a good image).
Hope this brightens your day. Craft something in vibrant colors today even if you can’t go walking in the sunshine.

Wednesday, February 3, 2010

Pull Out Your Winter Mittens

With all the cool weather we have had this winter in Florida, it made me dig out some of my old winter hats, gloves and scarves. In the spirit of the season, here is an idea for some indoor winter decorating to warm up your walls. Inspired by the cool holiday papers and embellishments from Imaginisce’s Polar Expressions collection, I created these mitten templates to create a fun wall hanging display. This project can be added to a winter basket along with a mug and some hot cocoa or coffee for a warm and wonderful gift. Or you can attach some metal clips to the flip side and hang these in your kitchen to keep your favorite winter recipe cards on hand. And if you want another clever gift-giving tip, just attach a pockets to the back sides of the mittens, one with a gift card and another to insert a personal note. Or turn them into a winter mini album. Use this template along with the winter hat one I designed to create coordinating winter mini albums.

This was a project I created for Glue Arts showcasing their Wall Art Decor Adhesive (used to apply paper to handcut mittens); High Tac adhesive (used to reinforce edges and small attach embellishments); Adhesive Squares to attach Poinsettias and bird die cuts. Note: diecuts and texture envelopes are from Stampin' Up!®.

Friday, January 29, 2010

Valentine Hoot Box and Mini Card

Using my SU bitty box and envelope die with my sizzix big kick, I created this adorable gift box and card set for Valentine's Day. The owls are from Sassafras' Olivia & Pals clear stamp set, the flower petal is an older SU punch, the heart is a Marvy scallop heart punch and backround flower is also a Marvy Punch. The cardstock is a personal favorite collection called Classic K McKenna from K&Company along with Soft Vanilla from Stampin' Up!® and Tan CS from The Paper Co. Other supplies used: Brown satin ribbon, light and dark pink rhinestones, Chocolate Chip ink, Regal Rose Marker, stamping sponge (to distress edges), Glue Glider Pro with high tac adhesive, Glue Arts' ribbon adhesive and mini adhesive squares. I displayed this project at the CHA Craft SuperShow this past Saturday. This is a close up view of the gift card and box top. Scroll down for more photos.


Some design notes: I used mini adhesive squares to make & attach the ribbon loop under the punched flower. If you don't own this punch, you can substitute with a similar size flower. To create the 2 toned owl, I stamped once in chocolate chip, then once using the Regal Rose brush marker to color and stamp. I trimmed out the heart shaped face and adhered to stamped brown image. I trimmed around owl shape and mounted to layers on mini gift card. For edging on card, I used a stamping sponge dipped into ink pad. I drug along CS to distress. I freehand cut the mini pink heart from the wing portion of the owl I stamped in Regal Rose.


Don't forget to dress up the outside of the envelope. Here I used the scallop heart punch with a lightly patterned solid CS from the collection so I could write the name of the person I was giving it to inside the heart. Again, I edged in brown ink to make it pop!


This shows a view of the inside of the mini gift card with the ribbon wrapped around the inside. I added a tiny verse from a retired SU set, called Be Mine, but you can add in your own stamped verse or set up a message on your computer and print out. I edged Vanilla CS with rose marker.


Saturday, January 16, 2010

50 doesn't mean you're a fossil!


When coming up with a name for this card creation for my brother-in-law’s 50th birthday, I thought it would be humorous to poke a little fun at being archaic at the age of 50. This card utilizes the faux fossil technique using reinkers, glossy stock and rubbing alcohol so it just made sense to call the card Fossilized 50th Birthday. The numbers are from an older Inque Boutique set, Shari Numbers, which is a favorite of mine to use for momentous birthdays. The Stampin' Up! verse on the inside is another personal favorite for birthday wishes! Hope these ideas inspire a great card idea for a special birthday recipient.

Friday, November 20, 2009

A Talented Friend


I have a wonderfully talented friend who credits me for introducing her to stamping and scrapbooking through my Stampin’ Up! demonstratorship. She has gone on to become a demonstrator also and is not only filling my shoes, but overspilling them with talent. I am finally getting caught up on posting these wonderful projects she designed for us to create at a workshop at her Stamping Oasis. One of the cards, I call Flourishing Elegance. You will know which one...it is so chic and beautiful! The second card, I called Take A Spin. It is a spinner card created using the fast and easy to use Simply Scrappin’ Stickers along with some punches and stamps. The third project, I call Twick O' Peek. It is a gorgeous Halloween box with a peek-a-boo diecut window in front. Hope these inspire you to create wonder creations based on Ree’s ideas. Click here to check out her blog.