Showing posts with label birthday. Show all posts

Sunday, June 10, 2012

Manly Cards for Any Occasion

With Father’s Day just a week away, you may be looking for some inspiration for making some masculine handcrafted cards. From an easy breezy military themed sample to feeling the coastal breezes, here are some samples to get your creative juices flowing...

For this card I wanted to do something special for my husband who is a terrific dad so I built a scene from stamps and techniques. For this I used a wave and palm tree stamp. For the sun, I used a punched circle and a sponge to define the shape then used markers to color in the sun. The sky was created using pastels. See below for some tips on creating the white ocean edge and shoreline.

Coastal Paradise Card created for Father’s Day
(but is suitable for any occasion!)


I first tore a strip of card stock to create a deckled edge. When stamping the ocean, I stamped over top of the strip to create a more natural shoreline. Then I used the same strip and a blender marker to rub some of the ink over the deckled edge it and onto the card a slight space away from the bottom of the wave. This creates the white foam area. For the sand, I used a combination of colored markers and a to create the spattered look, I used my old Stampin' Up spitzer with brush markers for the ocean spray and to give the sand it's sandy texture. 

Note: I also used Ivory naturals Cardstock as my background which already has some texture to it.

Tip: to extend the surf on each side of the palm, stamp a tree onto scrap and cut out. Use this as a mask with some temporary adhesive when stamping the waves in the background.


I wanted a softer edge, so I used my corner rounder on the 4 corners.


To finish the card, cut strips of coordinating cardstock and arrange in assorted lengths for background. I grabbed a piece of soft raffia from my scrap pile to tie around the art before mounting on the card. Being a tropical state of mind, I wanted to create another card with this palm tree image. I will also share with you my technique for creating the multi colored watercolored foliage stamped in the background along with a tip for putting coffee filters to use in your cardmaking. Read below!

Palmy Breezes Card
(another Father’s Day creation suitable for any time of year)


Creating a watercolor effect with multi-colored foliage:
Turn your rubber stamp face up and color entire image with a very light color marker. Randomly color over top with 2 - 3 other darker shades. Be sure to "clean" your brush marker off by rubbing off any of the colors it may have picked up onto some scrap paper before storing it away! Use a spray bottle of water to mist over the stamp lightly before stamping onto background. This is what gives it that watercolor, washy look.

Coffee Filters aren’t just for coffee!
Take a coffe filter and mist it with colored spray mist. I used a walnut ink on mine. Crumble and fold it, then tear of a piece of it to incorporate on your card creation.

Golden Years Birthday Card
(could also be used for Father’s Day or any occasion)


Sometimes card creating dictates trying things outside of your comfort zone or working with colors outside of your normal favorites. I created this card thanks to the extreme generosity of my stamping friend Ree Nathan, a fabulous SU demonstrator, who shared with me some of the new patterned papers, etc. from Stampin’ Up!®. I was so excited to test out the pack of In Colors and markers she gave me the day we had lunch and stamped...can’t thank her enough! I used some of those new In Color markers on the Coastal Paradise card, too! I got to play with some of the frame dies and new patterns. I wouldn’t have picked this color combination ordinarily, however I do like the end result.

Now it’s your turn...


Let’s slow things down a bit and end with an easy to make card layout. For my starting point, I merely stamped this old military theme rubber stamp into the upper area of a piece of trimmed cardstock I grabbed out of my leftovers stash. I built the card from there coordinating another patterned piece of cardstock and some solids to go with it. To complete the look, I added a pennant, a vintage gold button with thread and a Father's day stamped verse. To give it an aged feel, I sponged and dragged ink over the edges.


Military Style Father’s Day Card
(simply change out the sentiment to use for other occasions!)


Easy, Peasy, right? The rest is up to you! Happy creating and an early happy Father’s Day to all the great dads out there!

Tuesday, May 22, 2012

Making Birthdays Oh So Sweeter!

Using the great embellishments and papers from Little Yellow Bicycle's Cupcake Love collection  can make any birthday card just that much sweeter! See for yourself in these easy to create card samples.


Felty cupcakes are just so yummy!
On the card below I added some rhinestone bling to my verse to coordinate with the heart rhinestone on the cupcake. For bright cheery cards, try this color combo: hot pink, yellow, magenta and white!


The card below also combines a new patterned paper from Stampin' Up!®, a wonderful sample from my demonstrator friend, Ree Nathan.

Sunny Sweet
I just love it when I can mix together a bunch of scraps, some new patterned cardstock, pull a few elements from my vast cardmaking stash pile and turn it into something cheerful to wish someone a wonderful birthday!


Hope these ideas sweeten your day and help you to..


Tuesday, January 10, 2012

A Sale that's oh so tweet!

Today I have three tweet things to share with you...the details of my 4 day sale, a new set to reveal and a hybrid birthday card for your crafting inspiration. If you have some craft or design projects to create, now is the time to stock up on some of my digital designs while they are 30% off!


This is also the perfect time to get started making those Valentine’s cards and I have just the set to get you started. It is my latest release called Big Mouth Valentines. This is just the first of a couple Valentine sets that I am working on. Let me know what you think of it!


It retails for $4, but is also on sale in my shop at MyGrafico. You can layer the art over digitally colored and patterned papers for scrapbooking, print the b&w designs out and hand color to create fun cards or valentines. The bird, monkey and lion have hearts in their mouths which can be fun to add flocking, glitter and shine to! I hope to make up some samples soon and post here on my blog.

Here is a hybrid card created using color clip art from my Cuppy Cakes build-your-own set. It is a birthday card I made for my dad. 


 I am also including this photo of the inside of it where I also used clip art to dress it up! This is a perfect set to have for making cards for just about any occasion.

Thursday, September 1, 2011

A Birthday Present for You!


Why celebrate my birthday alone? Today, I am giving you the gift of 50% off everything in my digi design shop, today, Sept. 2nd until midnight EST. Get into the birthday spirit with these two new build-your-own clip art sets...Cuppy Cakes and Lovey Cakes.


Cuppy Cakes is great for festive occasions, birthdays, baking graphics and to create your own printables. 


 For special occasions such as Valentine's Day, anniversaries, birthdays, engagements, weddings and birth announcements, Lovey Cakes has three classic color schemes to create gorgeous designs.


Friday, July 15, 2011

Project 365 Challenge - Days 147 - 154 Seven days of Inspiration

Day 147 - Selecting, Printing & Sorting Photos
I understand that a photo of boxes of photos may not seem very creative, however, it can be a very time-consuming task going through all your digital photos and making prints for future projects and gifts. Today, I am inspiring you to make prints of your favorite pictures. Print some for yourself and others to give as gifts.

I wanted to give Ashley’s best friends, all seniors who were graduating, prints of favorite photos from their best friends photo shoot I did along with their graduation cards and other gifts. The kids all really appreciated the prints. In this day of digital where most of their images are stored in facebook albums, they liked having tangible photos that they can take with them to college and hang up in their room.

I also printed photos to make an album for Dan for Father’s Day of the girls along with sets of prints taken when family came to visit for Ashley’s graduation and Kylie’s 16 Birthday party. I was lucky enough to take advantage of 10 cent prints at Walgreens...lots of sorting, yet a creative use of time! Look for specials at Walgreens, Walmart, Shutterfly or Snapfish to save on printing your favorite digi photos.

Day 148 - Red White & Blue Graduation Card
Traditionally stamped card in red, white & blue featuring silver embossing which always add elegance to any card creation. I used silver ribbons for texture and to compliment the silver on the card.


Day 149 - Mulberry Floral Birthday Card
Digi stamps don’t always have to be printed in b&w! I colorized my Gardenia digi stamp in photoshop to match the paper, then add touches of color. I will be sharing a tutorial of how to do this soon.


The art is from my Gardenia Digi Stamp set:

Day 150 - Pastel Gardenia Birthday Card
Using the digi stamp from the same set featured yesterday, I created this hybrid card layering the b&w stamp on top of a digital paper with lace frame. The lace frame, I created using a lace strip from my Gettin’ Grungey collection. Since my mom loves lavender, I used that as my color palette and paired with the patterned paper from Basic Grey. A traditionally stamped birthday verse was added with some punched border strips and a ribbon. To achieve the soft coloring on the flower, I used chalk pastels.


Day 151- A Good Luck Grad Card Made in Minutes
What do you get when you pair a cool foil stamped piece of card stock with some DCWV cardstock, ribbon and a stamp? The answer is a card you can make in only a few minutes. Every card doesn’t have to be a masterpiece. This one proves, simple and elegant can be just as nice!


Day 152- Pulling from the Stashes to create a vintage card
This Vintage Hybrid Sympathy Card was created from elements in my digi & svg print and cut stash, a folder I keep with misc. printouts of digi art and svg cutouts for use on future cards and projects. I paired the digi stamp from my Elegant Frames set with a Swirly QZ’s dicut, some ribbon, old patterned paper, flowers, pearls and a paper butterfly diecut element to create this sympathy card for a family member.


Day 153 - New Party Pack Set & samples
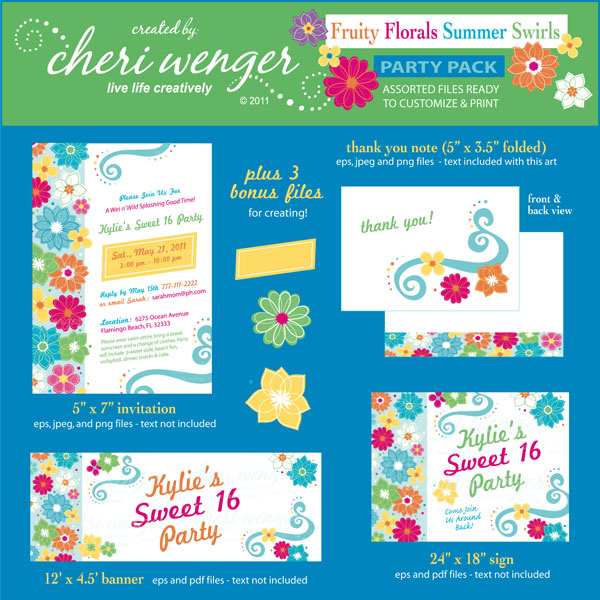
I designed this Fruity Floral Summer Swirls Party Pack collection, which was inspired by my ML Fruity Florals collection plus the need to design an invitation for my daughter’s 16th birthday. It evolved from that into a banner, sign (featured on days 127 - 129) and now, a thank you,  so why not put it in a collection to make someone else’s life a whole lot easier?!!!!


Day 154 - 25th Anniversary Card
Next month is mine and Dan’s 25th anniversary and knowing how time flies, I made the card back in June using more of my Swirly QZs svg diecuts and some other items from my favorite stash piles. I love this paper from the Girls Paperie...so pretty and it paired well with my polka dot silk flowers and swirl flourish. I used a brown digi printout of art from my Special Numbers collection to matt and layer on top. The oval was a saved diecut that added a matted effect when layered over the patterned paper. When embossing card stock with folders and end up with mini scraps, try layering under a stamped verse as I did in this card sample. Another tip to try is tying sheer ribbon around your background layer before mounting, then layering elements on top for a multi-dimensional card creation.


Here is a preview of the Special Numbers Collection, one of my earliest releases, an oldie but goodie!


Hope you found lots of cardmaking inspiration from this week’s flashback to my Project 365 challenge.

Tuesday, January 18, 2011

Project 365/Day 14 - A Birthday Card for a Friend

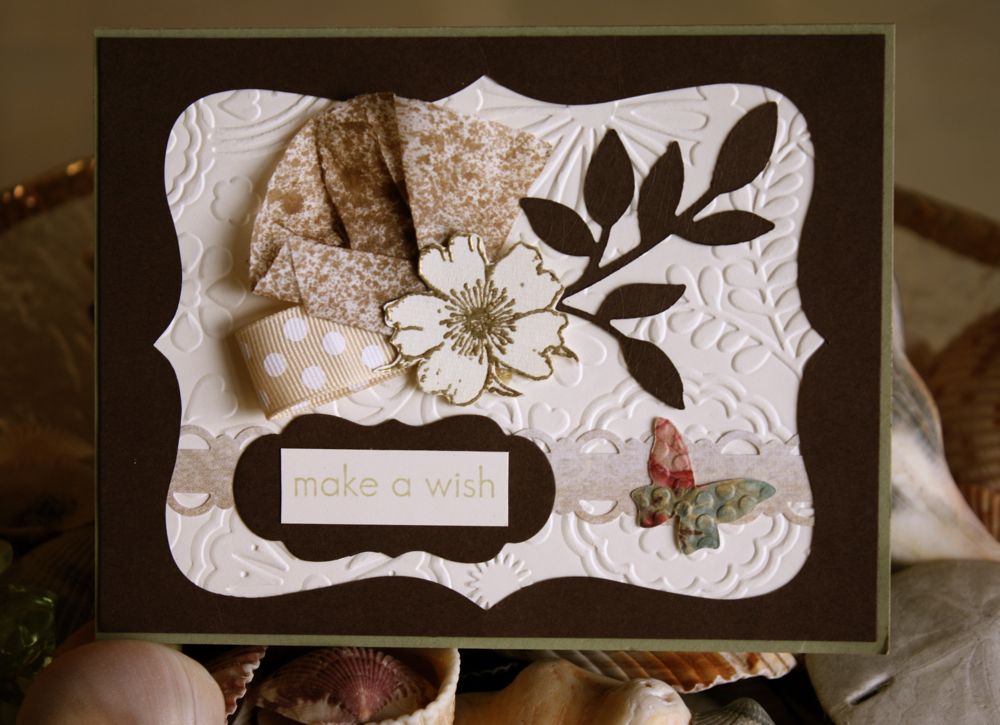
Time was running out and I needed to dig into my scraps pile to create this project before day’s end. It is a birthday card I made for a friend of ours who is losing her battle with cancer. I delivered it with a little gift on Sunday to let her know that we were thinking of her. The speckled element is a coffee filter that was spritzed with Walnut ink, cut and folded. I kept all neutrals as part of the main design with one tiny accent of color...a small butterfly diecut and embossed from a beautiful paper stock from Karen Foster Designs. I stamped the make a wish verse to complete the card design. Challenge yourself to create a project using neutral colors with just a hint of color.

Friday, December 24, 2010

3 Day Christmas Sale begins today!

Wanna fill your stocking with some digital wonderfulness? Check out the 3-day 20% off Christmas sale at http://www.mygrafico.com. Everything is on sale so have fun stuffing your shopping cart!


For some inspiration for making some after the holidays Thank You's, 
here is a hybrid card created with my Elegant Name Plates set, gorgeous papers 
from K&Company along with a butterfly stamp from their Que Sera Sera clear stamp set. 


Designer tip: I printed the plum colored frame with the word thanks typeset in black 
onto a high quality sheet of white Epson paper. Sponged over the frame with ink, spattered 
with teal and purple markers, trimmed around the frame with scissors and layered over 
top of a ribbon. I used Glue Arts high tac adhesive with my Glue Glider Pro for 
assembly and a small strip of ribbon adhesive to attach the body of the 3D butterfly. 


And using my Vintage Pines set along with some artistic papers from Lil Ellaboudy, 
another mygrafico designer, I created this years Christmas card, digitally.

Be sure to add these 2 Brand NEW Released sets to your wish list!
For those of you who love to work in Photoshop with brushes, you will love the Mod Labels 1 set.


And for those of you who want to work with eps, jpeg or png files, try these pre-colorized labels and verses. 72 files in all....what a deal for $5.50. And if you buy during the sale they are even less!
You can use the png files to colorize or editable eps to colorize or even add multiple colors to these designs. Perfect for handmade tags, gift labels...think wine bottles, baked goods, gifts and more!


These can also be used to create monogrammed note cards or embroidered items. Check out this sample using a background border from the Lovey Dovey Brushes set and Mod Color Labels.


Merry, merry Christmas to all! Live Life Creativley in 2011!

Tuesday, December 7, 2010

Velvet Chic Hybrid Card

I made this card for my Aunt Carole, yet another belated Birthday card mailed off! I am hoping that my new 2011 calendar with photos of upcoming birthdays will keep me ahead of things in the new year! LOL, probably just wishful thinking! 


I created this card using velvet embossed paper in black and ivory from Me and My Big Ideas Sassy collection, a pad I have been stashing for a while. I paired it with deep red precut cards that I also had stashed away...are you noticing a trend here? Yes, I am finally using my papers and goodies instead of storing them away for a bigger, better project. Are you guilty of that too? Now don’t be lying, I know most crafters do this. The frame is from my Elegant Frames digi collection for sale at Mygrafico.com and the verse was typeset and colorized  on my computer and printed out with the frame. I added distressed sponging in black and dragging using a black ink pad.


The background ivory textured panel was created using my Sizzix Big Kick with the Cuttlebug Divine Swirls Embossing Template. For added elegance, I folded a wide black satin ribbon between the layers and held the loop in place with an adhesive square. I assembled the card using my Glue Glider™ Pro with extreme adhesive. I found this to be a good choice in cartridges for this project due to the texture of the layers. To finish the card, I added a strip of adhesive pearls on top of the ribbon to make the black pop.

You can use this card design for creating cards for any occasion. This digital frame set is very versatile and always elegant! Don’t know how to use digital art, then use stamps to recreate this project.

Hope today you are living life creatively!

Thursday, September 30, 2010

Birthday Bliss By the Sea

With all the recent tropical storms, the ocean has been a bit choppy and at times a surfer’s paradise. It reminded me of this recent birthday card I created using a color palette of two bright colors mixed with a neutral. The beige tone ink is Sahara Sand, the polka dot 5/8" grograin is from Bo Bunny’s Double Dot collection. The color is coffee. The blue ink is Pacifi Point and I used the stamping off technique to get lighter waves in back. The red ink is Poppy Parade and the two stamp sets are Just Surf and Birthday Bliss. All inks and Stamps are from Stampin’ Up!®. The red patterned paper is from Cosmo Cricket’s Garden Variety collection. It is the opposite side of Tossed Salad Cardstock sheet. The Royal Blue cardstock is from The Paper Company. I used dimensional adhesive foam and the Glue Glider Pro with high tac adhesive from Glue Arts.

Technique Spotlight:
Stamping off - create lighter shades from a colored ink by stamping image onto pad, then stamping onto a scrap sheet before stamping on project. For even lighter shades, you can stamp multiple times on scrap sheet before stamping on paper.
Dragging - to make a cardstock layer pop out without matting in a contrasting cardstock, simply drag the edges of your cardstock over an ink pad to frame it and make it stand out.
Sponging - use a sponge stamped into ink to apply light shading to cardstock or to drag around paper edges for a soft framed effect.

Tuesday, May 25, 2010

Things Aren’t Always Black & White

...Or Are They?
Just as in life, there are always some grey areas, and this card uses a clean and classic design playing on high contrast b&w colors with a grey pinstripe patterned paper from Doodlebug Designs as a neutral background. The punch and verse are both from Stampin Up!®.
The graphic is a digi stamp design from my Hip & Happy set, available for purchase on www.mygrafico.com.

Also using digi art from the Hip & Happy set, this next birthday card introduces aqua as an accent color to make the designs pop. I used the swirled element in this set colorized in white to create the black & white border strip. That is the exciting thing about working with the editable eps files in Illustrator...you can colorize them to what you want them to be or simply print in b&w or shades of grey added, as shown here for equally fun results.

A close up view of the border and digi art.
Border and Celebrate You verse from Stampin’ Up!®

Wednesday, May 12, 2010

Wind and Surf

This spring has been much windier than I recall since we moved six years ago. Yes, can you believe that...it seems just yesterday that we experienced that record amount of hurricanes that welcomed us in 2004. Usually by now the Wenger family should have a great jumpstart on our tans and frequented the beach more than a handful of times, but schedules and life has kept us far from the beach. We did get to go enjoy the beach on Mother’s Day. It was windy and the waves were crashing. It seems to be windier than usual and better waves than in years past. We are hoping to hae great fun up at Ron Jon’s with the surf board this year!

The weather conditions made me think of this birthday card I made recently. The surfer stamp is from Stampin’ Up! and the the cool flourish I picked up at Michaels before Christmas. I used Versamark ink and white embossing powder to create the deco wave on top of the cardstock and patterned paper layers along with my trusty Glue Glider™ Pro to assemble it!

Thursday, March 18, 2010

Preview of New Sets

Here is a quick peek at 3 of my new digital design products available for purchase at MyGraficO. The Elegant Frames has been a popular set for cardmaking, scrapbooking and for custom stationery. You can pair with the Elegant Verses sets to add text or create your own.
These are also great for elegant scrapbook page layouts! I also have a color version.

Another new design that has been well received is my Birthday Pals set with it’s whimsical characters. It comes with b&w art that you can color or edit on computer as well as the 12 bonus colorized designs you see featured. I have some great phrases that go along with these!


I know most of us are just about shaking off the cold winter weather, but Easter is right around the corner. Just think of the fun ways you could incorporate these Spring Chicks designs into your Easter creations! This set has pre-colorized designs that are ready to print and use, or you can use them in a photo editing program, such as Photoshop, to incorporate into digital or hybrid scrapbook pages. As I catch up on some sleep from my designing frenzy, I will be sure to post some examples here for inspiration!


Be sure to check the site and my blog for samples made with all my new releases, and I would love to see your creations in the gallery! Not sure how to use digital designs in your creations? Keep checking back to my blog for tips and examples of how you can, digitally, live life creatively!

Saturday, February 13, 2010

Combining Digi and Stamping

Love & Friendship Card

My friend Lindsay is a designer on a site called www.mygrafico.com so I purchased some of her sets and a couple others to play with along with my other crafting and stamping supplies. I had some baby cards, birthday and valentine’s cards to make so I got busy doing some hybrid and digital creations. Here is a peek at some of those cards. I especially love the uptown houndstooth set of papers. I have used the black background and altered the brown in Photoshop to match the elements of Cocoa Studios Mod Nature set. The Baby Bingo set is a free download and I had fun changing up the colors to use the sweet bingo card on a variety of cards. I will post more cards this week. Wait ’til you see the cards I made with the Love Grows Here set. Too cute!
Your Family Has Grown (Baby Card)


Inside Detail (see coordinating gift card from Toys R Us)


A Little Birdie Told Me (congrats for new grandma card!)

(inside the card - plenty of space to write my message)

Houndstooth Hugs & Kisses Card ...Tri-fold card with heart tied into bow


Birthday Boy Bingo Card

So you ask how do you work with digi stamps/art? You can use the jpegs or png files to place directly in Word, Photoshop or a layout program. Print them as is, color them in, change their color, combine art, etc. You can scale them, edit them and have fun creating! Sign up on the site. It is free. Ooh, and they are having a 20% off Valentine's weekend sale! Don’t you just love sales?