Saturday, January 22, 2011

Project 365/Day 21 - Cardmaking with Ree

Sometimes you are lucky enough to find a friend in life who makes you feel totally appreciated, who shares a passion for the same things you do and inspires you to be a better person. This is what I have found in my friend, Ree. She is a wonderfully sweet person (who is soon to be seen on Extreme Home Makeover in February) since she volunteered to help out with a home being built in the Central Florida area. She has more energy and enthusiasm about life and stamping, and has helped build my self esteem in always crediting me as her creative mentor. Whenever we get together for a day of stamping, I always leave with a smile. We share new tips and techniques we picked up between our play dates and catch up on family and friends...isn’t that the very best of living life creatively?!!! Here is a mishmash of some of what I created. We did more talking & eating than creating, but walked away energized and inspired to try new products and techniques.

I was very anxious to try out the Springtime Vintage DSP collection and pear pizzazz seam binding ribbon that was part of the goodies she gave me for Christmas. I typically am not drawn to old fashion style papers, but wow, was I inspired the more I worked with this. And the softness of the seam binding ribbon is awesome. I insisted that she teach me how she made these incredible paper flowers on a recent project she posted. And in her truly generous spirit, she dropped what she was doing to teach me how she made them. I am a bit disappointed that after mine flattened out on the ride home, I haven't been able to restore it to quite how good it looked when I was at her house, but you get the idea. And...it was made using the 5 petal flower punch, an idea she cased on the web. Pretty easy to do, and they looks so beautiful. Not great for mailing, but excellent for hand delivered cards and gifts! Check it out...


I took some closer up photos too. It is assembled using a simple brad!
I hand cut some accent leaves from Wild Wasabi that was texturized with an embossing folder.


And here is Ree’s Beautiful Letterpress card that was my inspiration!


Here is the Vintage Love Ya Card I made at her house
using background paper from Springtime Vintage DSP from Stampin’ Up!®
and 3D stamped butterfly cut out from K&Co Que Sera Sera clear stamps.
This card features the pear pizzazz seam binding ribbon...can you say gorgeous!!!
Trust me you will love the feel of it and using it on your projects.


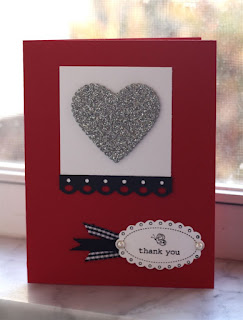
My daughter had to make a poster for a conference she was attending this weekend and we picked up some silver glittered adhesive foam for her to create the letters and graphics. She had some leftover scraps so I brought them along with me for Ree and I to play with. She ran some through the diecuts she had and I had fun using them on a couple cards. She really liked the color combination of red, black and white and silver. This could be used as a simple valentine, but I made it into a Thank You card.


I swear that this pink and black background with the canvas textured stamping strip has been in my scrap pile for several years now. I finally snagged some other scrap elements to make it into a cheery card. Don’t you just love that lil' owl. He is in one of the stamp sets (Punch Bunch) that are available for free during Sale-a-bration with a $50 purchase. So if you are needing any SU supplies, now is the time to order. I no longer am a demo, but Ree can take care of that. She has a website for doing online orders.


So, I encourage you today to surround yourself with friends who inspire you creatively and it will enhance your experience  and inspire you to live life creativley!

Thursday, January 20, 2011

Project 365/Day 20 - Triple Heart Photo Valentine

When you get a project idea you like, why not make more, right? I have to say that my day 18 project prompted me to create more personalized photo valentines this year. This one is for my daughter Kylie. I have also really been taking advantage of rummaging through my scraps to create new cards from left over embellishments and papers. I used papers from an old Basic Grey mini stack along with some retired SU sheer organdy ribbon along with an epoxy sticker from KI Memories.

You can frame your photo, use it on a corner as I did here or punch it into a shape to add to the Valentine. I am putting my valentine’s greeting on the inside of my cards and focusing on making the outside all about the recipient. Have fun trying this...you can even make it into a mini scrapbook page!

Technique to try out: Want to create a crinkled vintage looking ribbon? Use your embossing heat tool with sheer organdy ribbon. Hold it close to the ribbon and watch it shrivel up. Don’t go too close or it will burn.

Project 365/ Day 19 - "Tweet" Photo Valentine

Some of my favorite colors are in Cosmo Cricket’s DeLovely collection so I just had to use this collection again when creating a personalized photo valentine for my daughter Ashley. The fun colorful chipboard embellishments were perfect for creating this square valentine card. I angled the striped cardstock, layered a patterned paper square on top, raised up the chick with U-cut-It double-sided adhesive foam and attached the flowers with an extreme adhesive square, both from Glue Arts. For the main assembly I used my Pro with high tac adhesive. I added my own hand-lettered verse following the same angle as the stripes. I used an old technique for adding the bow accent which involves punching two circles close together, threading the pointed ends of ribbon down through the holes and back up through the opposite hole. I fringed the ends of the ribbon for texture and added the epoxy sticker with the word glamorous.

Try making a personalized photo valentine for someone you love. I am following this same project theme on day 20’s project. Check it out!

Project 365/Day 18 - Glue Arts & Girls Paperie Hearts Shadowbox

Tired of making boring covered boxes? Try taking them apart and making them into a fun item of home decor. That is what I did with this heart shaped paper mache box from Darice. Pairing it up with some favorite supplies, Glue Arts adhesives and papers from The Girls Paperie, I was able to turn this box into a fun little Valentine shadowbox of Dan and I. I had a harder time locating pictures than creating the project! LOL. See if you recognize any of the diecuts or punches used here. I also snuck in a crocheted poisie from Fancy Pants that I have had stashed away for too long now and a leftover flower chipboard from my favorite summer collection from Cosmo Cricket, DeLovely. The possibilities are unlimited when you have a little bit of paper and some endless creativity!


A little bit closer view...


The back view (great when it is set on a ledge and viewable from both sides)...


Keep watching the Glue Arts blog for a complete supply list and instructions on how you can make this fun project. Also, if you haven't signed up to receive email alerts for their blog posts, be sure to do that. If you are on Facebook, be sure to comment on their page. They are giving away products to celebrating hitting over 4,000 fans!

Project 365/Day 17 - Craftiness from a Workshop

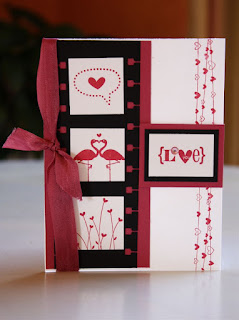
Check out these awesome projects designed by my Stampin’ Up! demonstrator friend, Ree Nathan. I got to enjoy my Sunday afternoon creating these wonderful projects with some super ladies. Even better, she and I are planning a follow up stamping date!


It is really a treat when I get to let someone else do all the thinking for me and all I have to do is assemble and add little touches of my creativity to a project. My note card variation came about when I punched the wrong side of the paper. I decided to try something different by adding a scrap of the red glitter paper behind the punched border. Why not, right? I had nothing to lose. Today's lesson: every project doesn't have to be perfect, and there are no mistakes — just opportunities for added creativity.

Wednesday, January 19, 2011

Project 365/Day 16 - Yearbook Ad


This project has been an ongoing, top secret project. Well maybe not super top secret. My daughter Ashley knows that she is getting a full page ad in her yearbook to celebrate her high school graduation, however, she doesn’t want to see it beforehand. The challenge is in choosing the photos that she most wants included. Every time we discuss it and she asks if I included a certain photo, things change. I have spent the last two days perfecting it with the input of the rest of the family. Hopefully she is pleased with the end result. So since I can't show the finished product, I grabbed some elements from it to show you a mini peek.

Tuesday, January 18, 2011

Project 365/Day 15 - Concert Photos

If any of you watch morning talk shows this week, you will know that The Script is an up and coming band that has opened for acts like U2 and Paul McCartney, and they have just released their second album, Science & Faith, which has already hit number 1 on the charts in Europe and is sure to skyrocket up the charts in the U.S. On Saturday, Jan. 15th I got to experience a fun girls night out in Orlando with my girls and our friend Diahn Clark watching The Script in concert at the House of Blues, a very intimate concert venue. There were no seats or rows, but if there were we would have been in about the 5th row from the stage. We all were awe struck and had a fantastic time. Today’s creative assignment was taking photos at the concert. These were just with my Lumix point and shoot camera so they aren’t high quality, however the images keep the memories of a very memorable night clear in our minds forever.

You can check out the album of photos on my facebook page!

Project 365/Day 14 - A Birthday Card for a Friend

Time was running out and I needed to dig into my scraps pile to create this project before day’s end. It is a birthday card I made for a friend of ours who is losing her battle with cancer. I delivered it with a little gift on Sunday to let her know that we were thinking of her. The speckled element is a coffee filter that was spritzed with Walnut ink, cut and folded. I kept all neutrals as part of the main design with one tiny accent of color...a small butterfly diecut and embossed from a beautiful paper stock from Karen Foster Designs. I stamped the make a wish verse to complete the card design. Challenge yourself to create a project using neutral colors with just a hint of color.