Showing posts with label owls. Show all posts

Wednesday, May 9, 2012

Ooooh, baby, baby!

There must be something in the air because this Spring, there have been a bunch of friends and family members having babies! This put me in the cardmaking spirit, something I have missed doing lately. I grabbed the cutest little embossing folder, a gift from my stampin' buddy, Trudy, to use on some cards. Keeping in line with a current design trend to use strips of pennants as a background, I created these baby boy cards...

Baby Boy Pennant Card (for new baby)
I added two navy mini brads to the wheels of the carriage! Make this in under 5 minutes!


 Baby Boy Mix Card (outside view)
Layered patterned paper pennants with buttons, polka dots and an embossed baby carriage. This card uses a mix of subtle and bold tones of red, white and blue.

(inside view)
Don't be afraid to coordinate the inside of your card with the colors,
papers and design theme used on the outside!


Embossed Carriage Card
White and Blue tones paired up with embossing adds up to an elegant looking baby card. I made this for our friend, Meghan, who recently had her third boy. To bring out the embossing more, you can dip a small piece of sponge into light or dark ink and drag over embossing. On this, I used navy ink to bring out the edges and lighter blue over top of the embossing.


Can't forget about the girlies!!!

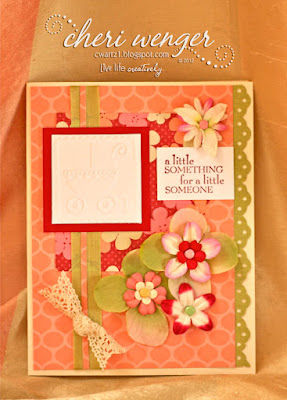
Lil' Something Card
Again, I used the same embossed carriage, except this time on a girly themed card. This was made as a congratulations for my cousin Chris and his wonderful wife, Kelly who gave birth to their second daughter, Jillian. By adding some delicate ribbons, a scalloped border and flowers paired with feminine patterned papers, you see how the overall look has changed to a girly theme.


And I couldn't forget about the big sis either!!!


New Baby Sister Card
Didn't want to leave out Brooke, the big sister, so I decided to see just what fun I could have using my owl punch from Stampin' Up!®. To recreate this card choose a couple solid shades of pink to coordinate with a sheet of pink patterned paper. You will also need a sheet of white cardstock and two shades of brown. I used a chocolately shade with a textured taupe color. 

You will punch the owl once in white, once in brown and then in each of the pink papers (both solid & patterned). Mix and match the punched items to create the owls. For the diaper, you can cut by hand like I did. Or just cut the legs and top half of the body off of an owl punched from white cardstock...my delayed lightbulb moment! LOL. For the diaper pins, just snip your pieces of one of the solid pink cardstocks. For the Flowers, I used the Boho Blossoms punch and layered with some owl punch leftovers. I used rubber stamps selectively colored with a brush marker to stamp the words A, New, and Baby. 

I wrote sister in my own handwriting with a pointed nib marker. By doing these on separate paper strips, I was able to trim to sizes needed and angle on the card. Congratulations was heat embossed with white powder. To make the big sis owl have a bit more interest, I used small white satin ribbon to make a bow. For the baby owl's bow, punch white paper scraps using heart from the owl punch. Combine two hearts with a tiny circle on top to form the bow.

Now that I have show you some cardmaking ideas for babies, next I will share a few cards for the moms. Check back for Mother's Day card Inspiration! Remember to Live Life Creatively!


Friday, February 17, 2012

Celebrating a late Valentine's Day...get inspired!

Since Valentine's Day fell on a weekday, it gives people carte blanche to celebrate that day, the weekend before, or the weekend after. If you are celebrating later this weekend then you may just need a little Valentine’s day inspiration. Here are ways that a I dressed up some gifts by using my clip art and hand colored printouts of my digi stamps to decorate a gift bag & make a homemade coupon...


For card ideas for guys, try a collage design with scrapbook elements...


Digi stamps give you lots of versatility. Print them and color them to coordinate with the papers and cardstock you have on hand. Then create great cards like these (made with my What a Hoot set).


This shows inside and outside views of the card...


Don’t be afraid to mix traditional and digi stamps together along with your favorite embellishments!


And now that Valentine’s Day is over, don't let the artwork from this digi stamp go to waste. It isn't just for Valentine’s Day. Use it for making cute get well messages, birthday greetings, and thank you cards, just like this... 


Whooooo knows where your creativity may lead you.
Be inspired to live life creatively!

Monday, February 13, 2012

Colors That Will Make Your Digi Garden Smile

Anticipating the latest cool front to move on out so that we can kick start spring time, I designed this set of coral, melon, yellow and brown flowers. You can use these designs individually or in groupings for graphic design, greeting cards, invitations, birth announcements, scrapbooking and crafting. These would make beautiful embroidered designs, too!

The Fresh Florals set is a combination of loose doodles combined with softly textured edges on the solid petal shapes. Coral is a hot color trend and these designs look great on a soft yellow or solid white background for a fresh, contemporary look.

If you still need to send a Valentine card, check out the email version I created using the photo card in my Owlentines Printable card and invitation set. I just personalized by adding photos in Photoshop and our family name.

Friday, January 27, 2012

Create, Save, Smile!

What do these three words have in common? New digital design releases and a 4 day, 40% sale in my digi shop at MyGrafico. I just finished three new sets featuring Owls with a Valentine/Love theme, but these adorable digi stamps and clip art designs can be used any day of the year to bring cheer.


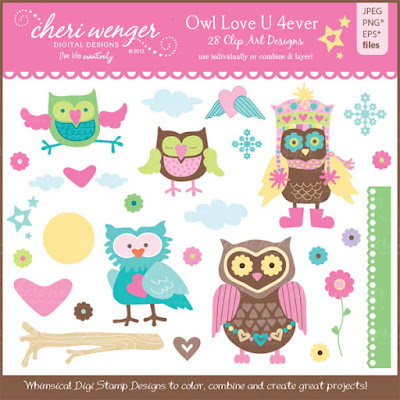
Here is a digital card example showing how much fun you can have creating with the Owl Love U 4ever set, my personal favorite design on 2012...so far, anyways! ;D  I have always loved owls, but had never designed a set with them. I started with sketches for digi stamps that you can color and add to your card creations, but I am a girl who love color so I couldn’t resist creating some clip art designs and printable artwork, too! Here is a peek at that set. This was designed with my new color palette for 2012!


Two of the three owl sets are posted in the shop...What a Hoot Digi Stamps and Owl Love U 4ever,  and the third is a printable set of cards and invites called Owlentines that I will be releasing soon. Here is a sneak peek at it! I will also be adding a free digital Owlentine valentine printable.


So if these cute designs aren't enough to bring a cheery smile to your face, maybe a 4-day sale on digitals at 40% off will do the trick! Check out my shop by going to the main page, finding Cheri Wenger under the designers pull down menu on the left hand side of the web page. There you can see all of my shops. If you prefer to shop by category, click the links above this, however you will have to sort through designs from other shops to find mine. Have a very creative weekend! I will be cheering Kylie on in the Disney Classic Volleyball tournament at the Wide World of Sports complex.


Saturday, January 22, 2011

Project 365/Day 21 - Cardmaking with Ree

Sometimes you are lucky enough to find a friend in life who makes you feel totally appreciated, who shares a passion for the same things you do and inspires you to be a better person. This is what I have found in my friend, Ree. She is a wonderfully sweet person (who is soon to be seen on Extreme Home Makeover in February) since she volunteered to help out with a home being built in the Central Florida area. She has more energy and enthusiasm about life and stamping, and has helped build my self esteem in always crediting me as her creative mentor. Whenever we get together for a day of stamping, I always leave with a smile. We share new tips and techniques we picked up between our play dates and catch up on family and friends...isn’t that the very best of living life creatively?!!! Here is a mishmash of some of what I created. We did more talking & eating than creating, but walked away energized and inspired to try new products and techniques.

I was very anxious to try out the Springtime Vintage DSP collection and pear pizzazz seam binding ribbon that was part of the goodies she gave me for Christmas. I typically am not drawn to old fashion style papers, but wow, was I inspired the more I worked with this. And the softness of the seam binding ribbon is awesome. I insisted that she teach me how she made these incredible paper flowers on a recent project she posted. And in her truly generous spirit, she dropped what she was doing to teach me how she made them. I am a bit disappointed that after mine flattened out on the ride home, I haven't been able to restore it to quite how good it looked when I was at her house, but you get the idea. And...it was made using the 5 petal flower punch, an idea she cased on the web. Pretty easy to do, and they looks so beautiful. Not great for mailing, but excellent for hand delivered cards and gifts! Check it out...


I took some closer up photos too. It is assembled using a simple brad!
I hand cut some accent leaves from Wild Wasabi that was texturized with an embossing folder.


And here is Ree’s Beautiful Letterpress card that was my inspiration!


Here is the Vintage Love Ya Card I made at her house
using background paper from Springtime Vintage DSP from Stampin’ Up!®
and 3D stamped butterfly cut out from K&Co Que Sera Sera clear stamps.
This card features the pear pizzazz seam binding ribbon...can you say gorgeous!!!
Trust me you will love the feel of it and using it on your projects.


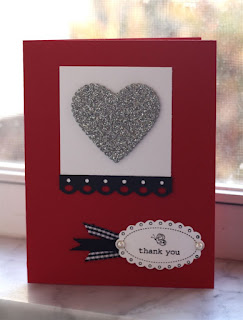
My daughter had to make a poster for a conference she was attending this weekend and we picked up some silver glittered adhesive foam for her to create the letters and graphics. She had some leftover scraps so I brought them along with me for Ree and I to play with. She ran some through the diecuts she had and I had fun using them on a couple cards. She really liked the color combination of red, black and white and silver. This could be used as a simple valentine, but I made it into a Thank You card.


I swear that this pink and black background with the canvas textured stamping strip has been in my scrap pile for several years now. I finally snagged some other scrap elements to make it into a cheery card. Don’t you just love that lil' owl. He is in one of the stamp sets (Punch Bunch) that are available for free during Sale-a-bration with a $50 purchase. So if you are needing any SU supplies, now is the time to order. I no longer am a demo, but Ree can take care of that. She has a website for doing online orders.


So, I encourage you today to surround yourself with friends who inspire you creatively and it will enhance your experience  and inspire you to live life creativley!

Friday, January 29, 2010

Valentine Hoot Box and Mini Card

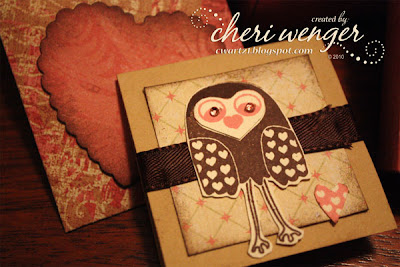
Using my SU bitty box and envelope die with my sizzix big kick, I created this adorable gift box and card set for Valentine's Day. The owls are from Sassafras' Olivia & Pals clear stamp set, the flower petal is an older SU punch, the heart is a Marvy scallop heart punch and backround flower is also a Marvy Punch. The cardstock is a personal favorite collection called Classic K McKenna from K&Company along with Soft Vanilla from Stampin' Up!® and Tan CS from The Paper Co. Other supplies used: Brown satin ribbon, light and dark pink rhinestones, Chocolate Chip ink, Regal Rose Marker, stamping sponge (to distress edges), Glue Glider Pro with high tac adhesive, Glue Arts' ribbon adhesive and mini adhesive squares. I displayed this project at the CHA Craft SuperShow this past Saturday. This is a close up view of the gift card and box top. Scroll down for more photos.


Some design notes: I used mini adhesive squares to make & attach the ribbon loop under the punched flower. If you don't own this punch, you can substitute with a similar size flower. To create the 2 toned owl, I stamped once in chocolate chip, then once using the Regal Rose brush marker to color and stamp. I trimmed out the heart shaped face and adhered to stamped brown image. I trimmed around owl shape and mounted to layers on mini gift card. For edging on card, I used a stamping sponge dipped into ink pad. I drug along CS to distress. I freehand cut the mini pink heart from the wing portion of the owl I stamped in Regal Rose.


Don't forget to dress up the outside of the envelope. Here I used the scallop heart punch with a lightly patterned solid CS from the collection so I could write the name of the person I was giving it to inside the heart. Again, I edged in brown ink to make it pop!


This shows a view of the inside of the mini gift card with the ribbon wrapped around the inside. I added a tiny verse from a retired SU set, called Be Mine, but you can add in your own stamped verse or set up a message on your computer and print out. I edged Vanilla CS with rose marker.