Showing posts with label Embossing. Show all posts

Thursday, June 14, 2012

Using the Hottest Colors in your Card Creations

Yesterday I picked up an issue of In Style magazine and my eyes settled on a page featuring shades of watermelon pink as one of the latest, hot colors to wear. Maybe I am a bit psychic when it comes to picking in colors, LOL, but I just created two cards last week featuring that color. In the first card I have paired it up with a hot coral color and used the technique I shared in my last post for handcoloring your stamp with markers, only I did not spritz this one, I let the markers blend the colors on the stamp.

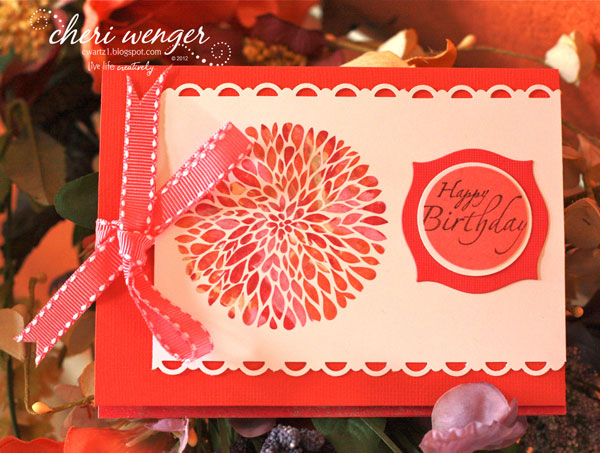
Another fun thing to try is stamping a verse and cropping it with a punch so it is still readable, yet it works with diecut frame. I used varying circle punches on this example with a diecut frame by Stampin’ Up!®. The result is a clean, simple, yet cheerful birthday card.

Mum’s Birthday

The textured watermelon cardstock used on this card, below, was embossed with a texture. I added interest to my punched scalloped circle by doing the repetitive stamping technique to create light and dark values of ink using this beautiful stem from the Watercolor Trio set from SU. The loopy border punch is from the Martha Stewart Collection. I used multiple embossing folders & punches on this card to create interest and texture, especially on the petals which were created using the 5 petal punch, embossing then cutting them in 2 or 3 petal sections to create leaves. The scalloped circle was raised up using dimensional foam, also allowing the sheer ribbon and petals to be placed underneath.

Strawberry Floral


So before you start your next card creation, take a peek online or in the fashion and home magazines to see what the latest, hottest colors are. It may just give you the creative spark you need to...

Wednesday, May 9, 2012

Ooooh, baby, baby!

There must be something in the air because this Spring, there have been a bunch of friends and family members having babies! This put me in the cardmaking spirit, something I have missed doing lately. I grabbed the cutest little embossing folder, a gift from my stampin' buddy, Trudy, to use on some cards. Keeping in line with a current design trend to use strips of pennants as a background, I created these baby boy cards...

Baby Boy Pennant Card (for new baby)
I added two navy mini brads to the wheels of the carriage! Make this in under 5 minutes!


 Baby Boy Mix Card (outside view)
Layered patterned paper pennants with buttons, polka dots and an embossed baby carriage. This card uses a mix of subtle and bold tones of red, white and blue.

(inside view)
Don't be afraid to coordinate the inside of your card with the colors,
papers and design theme used on the outside!


Embossed Carriage Card
White and Blue tones paired up with embossing adds up to an elegant looking baby card. I made this for our friend, Meghan, who recently had her third boy. To bring out the embossing more, you can dip a small piece of sponge into light or dark ink and drag over embossing. On this, I used navy ink to bring out the edges and lighter blue over top of the embossing.


Can't forget about the girlies!!!

Lil' Something Card
Again, I used the same embossed carriage, except this time on a girly themed card. This was made as a congratulations for my cousin Chris and his wonderful wife, Kelly who gave birth to their second daughter, Jillian. By adding some delicate ribbons, a scalloped border and flowers paired with feminine patterned papers, you see how the overall look has changed to a girly theme.


And I couldn't forget about the big sis either!!!


New Baby Sister Card
Didn't want to leave out Brooke, the big sister, so I decided to see just what fun I could have using my owl punch from Stampin' Up!®. To recreate this card choose a couple solid shades of pink to coordinate with a sheet of pink patterned paper. You will also need a sheet of white cardstock and two shades of brown. I used a chocolately shade with a textured taupe color. 

You will punch the owl once in white, once in brown and then in each of the pink papers (both solid & patterned). Mix and match the punched items to create the owls. For the diaper, you can cut by hand like I did. Or just cut the legs and top half of the body off of an owl punched from white cardstock...my delayed lightbulb moment! LOL. For the diaper pins, just snip your pieces of one of the solid pink cardstocks. For the Flowers, I used the Boho Blossoms punch and layered with some owl punch leftovers. I used rubber stamps selectively colored with a brush marker to stamp the words A, New, and Baby. 

I wrote sister in my own handwriting with a pointed nib marker. By doing these on separate paper strips, I was able to trim to sizes needed and angle on the card. Congratulations was heat embossed with white powder. To make the big sis owl have a bit more interest, I used small white satin ribbon to make a bow. For the baby owl's bow, punch white paper scraps using heart from the owl punch. Combine two hearts with a tiny circle on top to form the bow.

Now that I have show you some cardmaking ideas for babies, next I will share a few cards for the moms. Check back for Mother's Day card Inspiration! Remember to Live Life Creatively!


Tuesday, January 17, 2012

The Flight Continues

I really find it interesting knowing the story behind projects. Inspiration comes from many sources: our surroundings, personal experiences, favorite colors, images or designs, and even favorite products. These are but a few of the many things that can inspire a project. This card creation was designed to thank so many people who thoughtfully and generously reached out to our family during the loss of my mother-in-law, Jackie.

Mom’s favorite color was cobalt blue, but she just loved blue in general, so that is what I made it the main color used on this thank you note. I wanted to include some symbolism of her transition from her life here to a life in heaven. I believe this montage of butterflies does just that.

Supplies: (Stampin’ Up!®) Asstd. Blue Cardstock; Sizzlits Beautiful Wings Die; Thanks So Much verse; Finial Press Texture Embossing Plate; (Offray) Blue Satin ribbon; (Glue Arts) Extreme Adhesive Squares and Glue Glider™ Pro with high tac adhesive cartridge.

Butterflies also are a visual symbol for me of the life/death/after life transition since my uncle’s death in 2000. I would often get butterfly visits on my walks and have many other tales of this connection, too. Using a monochromatic color palette (different shades of the same color) creates a very elegant look that you can use in all your card designs. The cascading size of the butterflies adds movement and interest. This also serves to remind us that even though a loved one’s presence fades, the memories remain even though their flight continues.

I wanted to share another butterfly card created by fellow card designer, Diane Bove. She created these 3-D butterflies using a brush from my Stylish Butterflies set combined with patterned background.


Here is a preview of that set art which contains, editable eps, jpeg, png and abr (brush files).
The set contains 3 butterflies: one solid, one with transparent swirls to use over color or patterned backgrounds digitally and one butterfly with white swirls. If you use the photoshop brush file you can change the black to a color or patterned background. I will be creating some tutorials to show you how you can use digital brushes and png art in Photoshop. So check back to my blog for updates!


Let your creativity take flight with using a butterfly on your next card creation.

Wednesday, February 23, 2011

Celebrate Life...here and gone

Today is a bittersweet kind of day. It was my Aunt Floss’s birthday, and is now her granddaughter, Brooke’s. I feel a bit of sadness being reminded that my wonderful aunt isn’t here with us, but her spirit and memory lives in my heart. And the joy of the day is that Brooke celebrates her very first birthday. You may have remembered me working on her birthday invitations. Well now that they are all mailed out and her party is this weekend, I can finally share with you the labors of love put in to creating these cards. The final version includes an embossed CS layer, many punched items, rhinestone flames on the candle with glitter glue sprinkles on top of the cupcake. If you scroll down you can see how I coordinated the invitations and envelopes to go with the party goods that Kelly selected.


Happy 1st Birthday, beautiful Brooke!

Tuesday, February 15, 2011

Project 365 Challenge/ Day 44 - Valentine Love Folio

At first when I spied these folios in Staples, I thought about making a jumbo size card to put 
inside, but then I had a different plan in mind for my husband’s Valentine’s Day Gift. 
I still have an IOU out on that gift so I can’t share right now what I planned to put inside, 
but he is going to use it to store some assorted prints he has of the girls.  


The collage at the bottom is made up of some of the things he loves...cycling (chipboard 
from Crate Paper’s Restoration collection), Family (this stamp image and the love one 
are from K&Company Que Sera, Sera clear stamps) and the beach (a retired shell stamp, 
blender pens and markers from Stampin’ Up!® - also the embossed heart die used 
on two hearts is from SU!). I decorated the folio further using border stickers, 
CS matts and cut outs (like the pretty flower) from the beautiful papers in Crate 
Paper’s Restorations collection. For adhesive, I used my Glue Glider Pro with 
high tac adhesive along with some micro extreme adhesive squares for 
the buttons and some U Cut It foam to raise up the white heart die cut.

A closer view of the bottom stamping, die cuts, etc.


Just think of ways that you can use this same folio concept to create great gifts for 
other occasions. It would make a great teacher appreciation gift with cards or 
drawings inside from the class or it also would make for a fun way of 
presenting a gift certificate to a boss or co-worker! 


My challenge to you today is to find an ordinary office supply 
and turn it into something creative!
Live Life Creatively!

Monday, September 20, 2010

How to: Using Embossing and Bleach for surprising effects

I remember my early days of stamping and being wowed by a Christmas card I saw published in a magazine that featured embossing on a red background that had a multi-colored tree. I studied it in amazement thinking to myself, how did they do that? Well, I am going to share with you how you can wow your friends and family, too, by combining heat embossing with common household bleach to create surprising effects.


First I will start by showing you a simple card using embossing and how you can extract color. For this Vintage Lantern Card, start by scoring  2-7/8" from right edge and 1-1/2" from the left of my trimmed 8.5" x 5.5" black cardstock. Next, fold card to create uneven gatefold. As you should always do when embossing, I prepped the surface for embossing by rubbing my embossing buddy on top to cut down on the static. I stamped the In Style Stamps lantern stamp using VersaMark clear pigment ink and drew a line from the top of the lantern to the top of the card with a VersaMarker. I used gold embossing powder , shook off excess onto a scrap sheet and heat embossed the design. To subtract the color from the background paper, use ordinary bleach poured into a small cup and a paint brush. Carefully paint INSIDE the lines of the design to remove the color of the cardstock. This works best on papers that are dyed rather than printed. I used cardstock from The Paper Company which works well for this technique. Bleach tends to be drippy so be careful not to overload your brush and to choose a detail brush with a fine point. Also, you can use your heat tool to speed up the drying process!
I liked the color variations and didn’t try to make it all even white. This gave the lantern an aged feel.

My confession: I was hurrying along with my painting and goofed. See, nobodies perfect! If you know me, I never like to give up on a design. I always feel there is a work around, and you know what...I ended up liking the fix! I got bleach outside the lines [Oh no!!!] so when it dried and I speed heat set it, I added a drop shadow with a black marker to hide the discoloration, and I liked the added dimension it created! [Yeah, I planned that all along...creative genious, right?!!! LOL]


Next, use the small stamp from Circle Circus set from Stampin’ Up!® to add gold patterns around the lantern. Reminder:  I re-prepped with Embossing Buddy to prevent lots of stray gold specs since my hands were touching this while painting. Add two purple rhinestones inside two of the designs for some bling. If they are not self-adhesive, use Glue Arts’ mini adhesive squares on the back to attach.


Cut a strip of Perfect Plum cardstock to 1-3/4" x 5-1/2"and wheel with decorative pattern of choice. I chose the Very Vintage wheel and black ink. Note that I trimmed the cardstock larger than the black right hand fold. Attach to right hand fold using Glue Glider™ Pro and high tac or perma tac adhesive. This creates a strip of plum when opened and also makes sure no gaps show when card is folded in front. To finish, use slot punch to create hole on left panel for threading ribbon. Create adjacent slit down left hand fold using a cutting knife and matt. Make it big enough to feed your ribbon through. Tie bow in front as shown. Pretty easy, but really cool, right?


Now it is time to take it to another level...multi-colored embossed images! The next card uses a combination of stamps from In Style Stamps (lantern), Innovative Stamp Creations (verse and flowers) and decorative patterns from Stampin’ Up!’s Circle Circus set. I call this card Asian Friendship Greeting. Start by trimming out black card to fold to 5.5" x 4.25". Trim red cardstock to 5-3/8" x 3-7/8". Embosss two lanterns using same steps as described above, using VersaMark ink and marker. Paint with bleach and heat set. this may need repeating to get to desired shade of white.


Color in stamps using markers in your choice of colors. I used red, green, black and lt. blue on mine.
Stamp decorative pattern around lanterns in black ink.


Stamp and emboss smaller circle elements in gold in between patterns to bring out gold and deco feel.
Use Glue Arts’ Ribbon adhesive to wrap ribbon around red panel, wrapping ends around back side to hide. Tear strip of textured blue Bazzill Basics cardstock and attach to bottom of card. Layer panels on top of black card front using Glue Glider™ Pro and adhesive cartridge of choice (perma tac or high tac).


Stamp and emboss verse in gold onto scrap of black cardstock. Trim and layer on top of ribbon. Stamp flower design 3 times on Bazzil’s French Vanilla cardstock. I did one extra in case I goofed while cutting it out. This is much faster than going back and having to emboss all over again. Cut around flower contours using knife or scissors. Layer flowers using Glue Arts’ adhesive squares on back side. Finish with mini red rhinestones added to the center of each flower.

I hope that this tutorial has helped you learn a new stamping technique. Some notes about bleach: be sure that you take care to protect the surface(s) and your clothes because it can permanently damage these. If the bleach is not fresh out of the bottle, it will not work as well. I have tried putting in a sealed container overnight to travel to a demo, and it somehow lost its potency. Use immediately for optimum results.
Please share this post with friends and subscribe to my blog to learn more tips, tricks and crafty ideas!

Saturday, July 31, 2010

A Layout Appearing at CHA

This is a design team project I created for Glue Arts using canvas creatively with their new Extreme adhesive products launched at Summer CHA. It is presently on display at the show!


I decided to create a wall hanging scrapbook layout for my office of my niece Lauren. Since she has on a leopard print bathing suit, I wanted to play on lots of texture and use earthy shades like teal, green and brown with the white contrast. To make the texture on my canvas sheet, I used Stampin’ Up!’s new embossing folder that I tried out at my demo friend Ree’s house during one of our stamping “play dates”. I loved how it accentuated the texture of the canvas. See the detail, here..


Next, I applied pigment inks to bring out the embossing and used some of my smaller Cuttlebug Fancy Corner embossing folders for the smaller canvas tiles.  I also rubbed some of the brown ink over the textured Core’dinations cardstock used in the background. Check out Glue Arts’ website for the step-by-step instructions!

Friday, March 13, 2009

Here's to Longevity...it runs in the family!


I tease Dan, my husband, all the time about not getting rid of me anytime soon. You see longevity runs in the family on both parents’ sides. My grandpa Fred is in his mid 90's and his sister, Cecilia, just turned 90! So in honor of her SPECIAL birthday, I made this card for her.
It can be adapted for any special birthday. 

Supplies: (Stampin’ Up!®) Pink Pirouette, Basic Black, Whisper White & Pretty in Pink CS; Medium White Envelope; Pretty in Pink Classic Ink; Black Gingham Ribbon; Pretties Kit pearl; Square Scallop Punch; Circle Scallop Punch; VersaMark™ ink pad; Black Embossing Powder; Embossing Buddy; Heat Tool and verse on inside left from retired Birthday set - which can be typeset on computer! (Inkadinkado®) Flourishes/Arabesque clear stamp set; (Prima) Black flower; (Darice/Inque Boutique) Sharie Numbers; (Glue Arts) Glue Glider™ Pro with Perma Tac adhesive, Crop & Glue™ Ribbon Adhesive and Crop & Glue™ Permanent Micro Adhesive Squares

Friday, December 26, 2008

Country French Clipboard Calendar

Well, now that I have finished the Countdown to Christmas, I am anxiously counting down the days until the New Year begins! This is a clipboard calendar I made for my mom using Stampin’ Up!® products: chipboard clipboard, patterned papers, versamark ink, gold embossing powder, ivory tafetta & certainly celery ribbons, the full calendar and Mark the Date stamp sets along with So Saffron and Certainly Celery Inks to highlight the special days. This project appeared in my 12 Tips article in Scrap & Stamp Arts magazine, Dec. 2008 issue.

Friday, November 7, 2008

1st Dose of Christmas Inspiration!


Here is a quick and easy gift bag project featuring stamps from Stampin’ Up!’s® Doodle This stamp set, embossed in gold embossing powder and embellished with green rhinestones from Darice. I found the cute green pinstripe bag at Target for 49 cents. I used some gold ribbon, red tissue and red fibers I had to dress up the packaging. I was able to create this using just 1 sheet of 5" x 5" Wall Art Adhesive from Glue Arts!


The layered poinsettia was created with embossed flowers on Berry linen cardstock that were hand cut and layered. To give it some dimension and shine, I rolled up the petals on the top flower, sprinkled red glitter and applied it to the back of the petals. It attaches quickly to the wall art adhesive. I finished off the center with some green rhinestones from Darice.

Here is a close up of the decorative gift tag. You can add a seasonal message and to/from information on the back side. The edges were gilded in gold by dragging them across versamark pad and embossing in gold embossing powder.