Friday, May 25, 2012

As You Graduate

Today is the last day of school and now our baby will be an official senior. I am holding on because I already know how fast this ride goes! Summer will fly by in a flurry, admissions essays, SAT & ACT exams will be taken and Kylie will start her college applications and school tours. Next it will be her final season of volleyball, senior night, powder puff, senior project, prom and the final yearbook signing...all leading up to graduation night. It took me a few minutes to summarize in words and I believe this year will fly by equally as quickly when looking back. So seniors...savor every moment! Soak in every great lesson there is to learn and focus on having no regrets when you graduate. Congratulations to Joe, John, Meagan, Kaitlyn, Adrian, Nick and all the other graduates of the Class of 2012!

For this year's grad cards, I found inspiration from a card that I cased on Pinterest, created by Beth Apalooza.


Making it My Own
I modified the design slightly and created these cap & gown cards in assorted colors:


These are perfect to use as cards, announcements or thank you notes!

Here are some close up pictures of the individual cards...

The West Shore Colors (Navy & Silver)


Viera High Colors (Green & Gold)


Standard Black & White with Gold
(this one is for my niece's 8th grade graduation)


The easiest way that I found to mass produce these cards was to cut out templates of the paper piecings.
Here are some of the dimensions that I used:
Large triangle: 4-1/4" tall x 3-5/8" wide
Smaller triangle: 2" tall x 1-1/2" wide
Cap: 2-1/4" square
Striping: Cut 1/4" x 3-1/2" strips to glue and overlap under cap; trim excess from top of card.

Now for the tassel making tips:
1. Cut your template. I used a scrap of card stock 1-7/8"w x 2"h (*Note: the width doesn’t matter).
2. Wrap colored floss (embroidery thread) approx. 8 full loops around the cardstock and cut end.
3. Thread a small piece of thread under the top strands and knot. 
4. Next cut the bottom strands to remove from template. 
5. Cut a small piece of floss long enough to blend the ends in with the tassle.
6. Make another small knot to create the top of the tassle and blend threads in with the rest of the tassle. 7. Punch hole or make a slit with a cutting blade and mat to thread top tie of tassle through the hole. 
8. Insert colored mini brad in hole, knot the floss and trim before gluing onto card. 
**For added dimension, you can use double sided adhesive foam on back side of the cap.

Other ideas:
• Add a personalized mini diploma created on your computer.
• Dress up girl cards with rhinestones, mini pearls or bling, as on the card I cased.
• Use white or metallic alphabet stickers to personalize or add messages.
• Stamp a verse in versamark ink, then heat emboss in white or gold on the front or inside of cards.
(I did this on inside as well as to dress up the outside of the envelope. I used a collage of Good Luck, Congratulations and Graduation stamps and used the writing tip of the Versamarker pen to write in the lucky grad's name before embossing with gold embossing powder.)


Wednesday, May 23, 2012

In Search of Dolphins

We arrived in Florida in 2004, oh yes, that dreaded year of multiple hurricanes! It was a very memorable one, and like most newcomers, we were thinking that we would be seeing dolphins and gators fairly regularly. The reality is that you are more likely to spot a University of Florida gator before ever seeing a real one, and as for dolphins, the tail goes like this...

We were renting a home beachside near the Eau Gallie causeway so for the first month, the girls and I would randomly drive up by the causeway, park and stand by the Indian River in hopes of spotting some dolpins. We went on the pier behind the library and waited...and waited. We scoured the water from above each time we drove over the causeway (the bridge connecting mainland to beachside), with no real luck. So we finally brought daddy along and discovered Mather's Bridge (a crossing for cars and people connecting Indian Harbor Beach with the southern tip of Merritt Island.) It was here that we had our first, exciting dolphin siting...two dolphins feeding and playing by the bridge. The girls were around 9 & 11 at the time and super excited to see dolphins this close. Finally, it felt like we lived in Florida!

Two years later, we got to experience one even closer doing the Swim with the Dolphins experience at Discovery Cove, something Ashley will never forget about turning 13. Charlotte was our dolphin, a very dominant female who wasn't exactly the cuddly type, however we got to kiss her, touch her, and hang onto her fin and go for a very fast swim through the water. Dolphins are so muscular and full of power. My sister and I posed for a funny photo trying to lift the dolphin, or at least pretend to. Good things our lives didn't depend on it because even in water, they are extremely heavy!

Today’s card reminded me of these fun dolphin experiences. I used an swirly embossing template on my cardstock, inked a sponge and rubbed it over the surface to bring out the texture more in random spots. In wanting to create a colorful layer, I chose to emboss the retired SU dolphin stamp in silver and use blender pens and markers to create the faux watercolor effect.

Try out some of these techniques when creating your next card:
• Rub ink over embossing to really make the texture stand out
• Use gold or silver heat embossing to contain the colors when using actual watercolors
• Create a faux watercolor effect using markers and blender pens*

*To accomplish soft, subtle colors, rub a brush end of a marker onto a slick surface such as plastic packaging or a piece of acetate. Use a blender pen (marker with brush tip) to pick up some of the color and brush it onto your stamped image. You can use a piece of scrap paper to test color first or to color on and lighten your color before applying to stamped image.

Tuesday, May 22, 2012

Making Birthdays Oh So Sweeter!

Using the great embellishments and papers from Little Yellow Bicycle's Cupcake Love collection  can make any birthday card just that much sweeter! See for yourself in these easy to create card samples.


Felty cupcakes are just so yummy!
On the card below I added some rhinestone bling to my verse to coordinate with the heart rhinestone on the cupcake. For bright cheery cards, try this color combo: hot pink, yellow, magenta and white!


The card below also combines a new patterned paper from Stampin' Up!®, a wonderful sample from my demonstrator friend, Ree Nathan.

Sunny Sweet
I just love it when I can mix together a bunch of scraps, some new patterned cardstock, pull a few elements from my vast cardmaking stash pile and turn it into something cheerful to wish someone a wonderful birthday!


Hope these ideas sweeten your day and help you to..


Saturday, May 12, 2012

A Mother's Day Tribute

This photo art was created as a tribute to all moms...whether you have given birth, adopted or fostered a child, or simply have been thought of in a motherly way. I started off using a photo image taken of an arrangement of carnations given to my daughter Kai on Valentine’s day. See below for a peek at that image so you can appreciate how it was transformed into the artwork you see on the right. I used two great textures that I purchased from Kim Klassen's Bens Collection.

Kim offers a Texture Tuesday challenge which inspires artists and photographers to use her textures creatively. For this piece, “In the Garden”, I wanted to create a painterly, watercolor effect. I used a combination of layers and effects at varying opactities. From the Bens Collection, I chose textures 2 & 6, and selected a quote attributed to Claudia Chandi as my verse.

So how did I create this?
I used Photoshop with my original photo on the main layer, add the textures on top. To make the type more interesting I mixed two fonts and three coordinating shades of colors: a deep olive, dark red and a medium shade of rosey pink. Now take a peek below to see all of the original images that were combined to create this art.


Here is the original photo image...


And here are the two textures from Kim Klassen’s Bens Collection that I used...


Check out her Texture Tuesday Cafe,
and be inspired!

Happy Mother’s Day to all the great moms out there who daily work your mommy magic!


Wednesday, May 9, 2012

Ooooh, baby, baby!

There must be something in the air because this Spring, there have been a bunch of friends and family members having babies! This put me in the cardmaking spirit, something I have missed doing lately. I grabbed the cutest little embossing folder, a gift from my stampin' buddy, Trudy, to use on some cards. Keeping in line with a current design trend to use strips of pennants as a background, I created these baby boy cards...

Baby Boy Pennant Card (for new baby)
I added two navy mini brads to the wheels of the carriage! Make this in under 5 minutes!


 Baby Boy Mix Card (outside view)
Layered patterned paper pennants with buttons, polka dots and an embossed baby carriage. This card uses a mix of subtle and bold tones of red, white and blue.

(inside view)
Don't be afraid to coordinate the inside of your card with the colors,
papers and design theme used on the outside!


Embossed Carriage Card
White and Blue tones paired up with embossing adds up to an elegant looking baby card. I made this for our friend, Meghan, who recently had her third boy. To bring out the embossing more, you can dip a small piece of sponge into light or dark ink and drag over embossing. On this, I used navy ink to bring out the edges and lighter blue over top of the embossing.


Can't forget about the girlies!!!

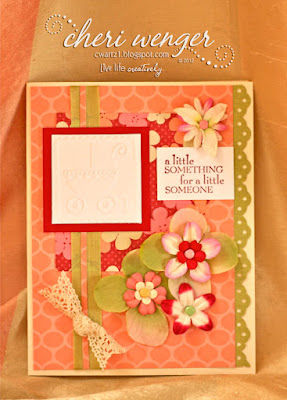
Lil' Something Card
Again, I used the same embossed carriage, except this time on a girly themed card. This was made as a congratulations for my cousin Chris and his wonderful wife, Kelly who gave birth to their second daughter, Jillian. By adding some delicate ribbons, a scalloped border and flowers paired with feminine patterned papers, you see how the overall look has changed to a girly theme.


And I couldn't forget about the big sis either!!!


New Baby Sister Card
Didn't want to leave out Brooke, the big sister, so I decided to see just what fun I could have using my owl punch from Stampin' Up!®. To recreate this card choose a couple solid shades of pink to coordinate with a sheet of pink patterned paper. You will also need a sheet of white cardstock and two shades of brown. I used a chocolately shade with a textured taupe color. 

You will punch the owl once in white, once in brown and then in each of the pink papers (both solid & patterned). Mix and match the punched items to create the owls. For the diaper, you can cut by hand like I did. Or just cut the legs and top half of the body off of an owl punched from white cardstock...my delayed lightbulb moment! LOL. For the diaper pins, just snip your pieces of one of the solid pink cardstocks. For the Flowers, I used the Boho Blossoms punch and layered with some owl punch leftovers. I used rubber stamps selectively colored with a brush marker to stamp the words A, New, and Baby. 

I wrote sister in my own handwriting with a pointed nib marker. By doing these on separate paper strips, I was able to trim to sizes needed and angle on the card. Congratulations was heat embossed with white powder. To make the big sis owl have a bit more interest, I used small white satin ribbon to make a bow. For the baby owl's bow, punch white paper scraps using heart from the owl punch. Combine two hearts with a tiny circle on top to form the bow.

Now that I have show you some cardmaking ideas for babies, next I will share a few cards for the moms. Check back for Mother's Day card Inspiration! Remember to Live Life Creatively!


Wednesday, April 25, 2012

Reasons to Visit Melissa's Blog

You must check out Melissa’s blog. Why, you ask? Let me give you three good reasons:
1. Her awesome craftiness. You will know doubt be inspired by some of her amazing projects.
2. If you love ribbons, lace & projects with a vintage look, she will dazzle you with her beautiful handmade cards. She always makes the prettiest bows!
3. Her amazing blog giveaway! Just go to this blog link for more details & to check out her inspiring projects.
If you are a fan of Spellbinders, you will just love the giveaway! (hint, hint!) I know that I do!


Sign up to follow her blog and continually be inspired by her wonderful creations.

Monday, April 9, 2012

Another Photo Art Creation from Cheri Wenger Design Photography

As I am getting things kicked into full swing with the photography end of my business, I am loving all the possibilities there are in combining all of my creative worlds together. Here is an example of some photo art titled “Contemplating” which was created using my photograph combined with Kim Klassen’s “little things” texture...part of her Texture Tuesday challenge for this upcoming week. You can check out Texture Tuesdays here...

kimklassencafe

Curious about the two images used to create this photo art? Let me give you a peek at those files so you can comment about the final art.

I started with this image that I took recently at a nearby park on a windy spring day.


Next I worked in photoshop overlaying Kim Classen’s Little Things  texture with a style effect...


I merged the images (note that I always keep a copy of the layered elements should I want to edit anything) and used assorted grunge and distressing brushes to create the photo edging. And the final result is this photo art. Be sure to check out my post on Kim's texture tuesday challenge.


Be sure to leave me a comment and like my Cheri Wenger Design Photography Facebook page.
More to come on my new photography website.

Friday, March 16, 2012

Making the Pieces Fit

Some days life is like a collage, which takes patience and planning to make things balance and work. This week has been a bit like that. Early in the week, I was excited to see the results of two projects that I had been working on recently. I designed a partial scrapbook using MyMemories™ scrapbooking software which I finished online using Shutterfly’s custom path tools. It was a birthday retrospect for my daughter's boyfriend of fun events over the past year. I was thrilled to see the 8 x 8 book, and James ended up loving it, too! (Pssst, check back soon for a giveaway and promotion involving My Memories scrapbooking software!)


But the day leading up to giving it to him, was eventful. My daughter had an allergic reaction to the lunch I packed. Unfortunately, I mixed up her gluten-free ravioli's with ours. The initial reaction wasn’t too terribly bad and was halted by some benadryl and claritin. She was a bit sleepy and had to chill out at home, which made it perfect for giving James his late birthday presents from us.

Here is James with his photo canvas collage of his high school soccer state championship highlights.


Most photo canvases are just one image stretched over the entire canvas, but Kai wanted to do a collage photos I had taken at the state championship game. Being short on time to execute this, she asked for my professional help. I worked on it in Photoshop to include as many of the important photos as possible along with the game’s scores, list of teammates and James’ name and number. Little did I know that the next day would involve some of the same challenges of trying to make things work out under stress...Kai had two recurring allergic reactions amounting in two separate ER trips in one day. That was a first and hopefully last time for that to happen. Returning home at 6 am the following day, we were less than thrilled with our second ER experience and the lack of care we received from our hospital. It seems more evident than ever that in today’s healthcare system, you are your best and sometimes only advocate for knowing what is best for your child. 

Our lesson learned: if you even think you need epinephrin, you better get over the fear of the needle and administer it yourself. ER personnel seemed to have an even bigger fear or resistance to giving it to you. Who would have thought that I would be forced into a career in nursing, against all creative resistance!


So this canvas represents for me what it often life’s daily challenge...making many things work, fit and balance at the same time while insuring the outcome is pleasing. We send out a huge thanks to Dali Decals for their awesome execution of this 20" x 24" poster-like canvas art and their speedy turn around. We know it is special to James since he is contemplating putting it in place of his Kelly Slater poster!

I hope that your next project allows you to pull all the pieces together and
  

Wednesday, March 7, 2012

A Tribute to Mom


Mom, today is your birthday, but you’re not here to celebrate it. Still cannot believe that you truly are gone. You’re not gone from my thoughts. You’re not gone from my memory. And you will never be gone from the hearts of those who love and miss you. Remembering you on your special day. Hope you are showing those angels how to age "grace"fully in heaven!

The above tribute to my mother-in-law was creating using the happy heart texture from Kim Klassen’s Cafe, a Texture Tuesday download from her blog. I enlarged a snapshot taken before my days of owning a SLR digital camera. I masked it in photoshop, did retouching and applied layer effects to blend the photo with the background for a ghosted, subtle photo effect. The remembrance text was added along with design elements created with some of my own digital brush designs. To finish the vintage feel, a grunge border and some small distressing was added.

Friday, March 2, 2012

All about Sharing

Today is all about sharing...sharing inspiration, sharing tips and sharing news!


Sharing Inspiration...Sometimes certain paper collections inspire me by their colors, the mood they convey or the wonderful designs and embellishments in the set. When this happens, I just can’t seem to stop using items from these in my cardmaking, even long after their debut release. One of these collections is Cosmo Cricket’s DeLovely collection. It has some of my favorite bright colors combined together with some super cute chipboard elements. Another is Crate &; Company’s Recollections collection. Love the warm, vintage feel of this collection along with the amazing color combinations. Another amazing line of papers and accessories is Little Yellow Bicycle’s Cupcake Collection. The colors and cute embellishments can’t help but bring an immediate smile the second that you look at them.


For these assorted handmade cards, I used two of my favorite collections and a few of my digi art designs, but one thing that these cards have in common are that they are all bright and cheerful. Two of these are hybrid cards (they mix traditional cardmaking elements with digitally produced & printed art) and the other two are traditional cards made using stamps and other embellishments.

The Hybrid Cards


Caring Owl Card
This hybrid card was created using a printout of the night owl from my Owl Love U 4ever clip art set. I trimmed around the image and mounted onto cardstock from the Cosmo Cricket DeLovely collection and added a flower, button and ribbon as embellishments.


Hummingbird & Flowerpot Card
Hybrid card created using my Ain't Love Tweet digital stamps collection with 
Cosmo Cricket’s DeLovely collection papers. Can be used as a sweet 
everyday greeting or a special get well card for a friend.


The Traditionally Made Cards


Little Late Turtle Card
Used a chipboard image mounted onto squares of Coordinations cardstock. 
Stamped verses added with stamps from Stampin Up!®. A cute cupcake from 
Little Yellow Bicycle's Sweet Shop Collection of Fabric Favorites was added 
with a ribbon to dress up this cheery, belated Birthday card.


Birthday Sweetness Card
For this traditionally handcrafted card, I used an adorable felt embellishment mounted 
onto a tied ribbon and scallop floral diecut from yellow Coordinations cardstock. 
Stamped an old birthday verse with a stamp from Stampin Up!®. 


Sharing Tips...Since this post is getting longer than anticipated, I will keep this tip short. It is a tip on how to integrate digital artwork into traditional cardmaking; something that I used on one of the cards above. TIP: Use Selective Matt Cutouts of Clip Art to add to your cards. Can you guess which card uses this tip? If you guessed the Caring Owl Card, you are correct! The easiest way of doing this is to place your print out onto a cutting mat, and use a sharp cutting knife (like an Xacto knife) to selectively cut around the contour of the image/design. You can leave as much of a white border as you like. Printouts can be done on cardstock or paper, although beginners may find it easier to cut through paper rather than heavier weight cardstock. Don't own or fear a cutting knife? You can do this with a pair of short blade paper snips.


Sharing News...Just couldn’t resist sharing news of a cool blog giveaway! My super talented friend and fellow crafter, Melissa Bove has a blog giveaway. For complete rules and instructions, check her Giveaway Time blog post on this event. You can win a $50 gift card and goodies from the Echo Park Graceful This and That collection! Here is a peek of just one of the items you can win! Be sure and mention that you heard about the giveaway here! (The neat thing about this collection is that it reminds me of a blend of Crate & Company’s Recollections collection with a mix of my favorite softer color hues!) Good Luck!

Wednesday, February 29, 2012

Leaping Ahead to New Adventures


Leap Day is a special day. It only comes once every 4 years. What makes today special for me is that I will be leaping into new and exciting areas. The first is promoting my photography, a passion that I have kept pretty exclusive to my family. And through the encouragement of so many, I am now opening those doors and making it official specializing in on-location, natural lit portrait photography. 


Yes, this will include families, couples, friend sessions, senior portraits, children, adults, pets...you name it! I can’t wait to express my creativity through the lens. My focus will be on capturing real moments, natural emotions that portray the real people behind them. My photography mantra is “capturing images; creating memories”. I will be able to combine my photoshop & design skills to create even more unique portrait, event and vacation memories as well as bring that creativity into fun photo shoots. For a little sampling of just some of that creativity, take a peek at yesterday’s blog post or take a peek at the vintage look given to this portrait of Kylie and James with his State Championship soccer medal.

I am working on putting together a website that will house all of this creativity, for Cheri Wenger Design, Cheri Wenger Digital Designs as well as Cheri Wenger Design Photography. It is a huge endeavor, but I am up for the challenge. Updates on this project will appear on my blog, so check back to see the progress reports. Feel free to contact me at artz1@cfl.rr.com for pricing information or to book a mini session or full photo session.

Change breeds more change, as they say. And with this, I will regretfully be closing up my shop at mygrafico.com to concentrate on these new endeavors. So if you are dying to purchase any of my sets, you can still do that today, or you can contact me directly about how you can purchase those by emailing me at artz1@cfl.rr.com. 

There are so many exciting things happening right now. I will be hosting a blog giveaway for a very exciting product. Keep popping back and visiting my blog for more details on this, and as always, for inspiration on how to live life creatively!

Tuesday, February 28, 2012

Texture Challenge = Inspired Art

A true sign of a creative talent is someone who is willing to share their gift with the world. This is truly the experience I found today signing up for Kim Klassen’s Texture Tuesday list. There are some simple guidelines for receiving and using the free downloads, all of which are very easy to follow.  And did I mention the challenge that corresponds with the texture? Today’s challenge lead me to a fun mini still shoot, that I refer to as White Hot Shells. I plan to share more of these series of photos as I work on them, but I want to encourage everyone to check out Kim Klassen’s Cafe website and blog.

If you are a photographer wanting to experiment with combining textures and your images, you will feel like you found the pot of gold in the selection of gorgeous textures available on her site for purchase. And for those just dabbling, you can try out some of her freebie downloads...all are stunning! I purchased the Bens collection and the group of rectangle textures to get started. For my photo art project I combined a few of these textures, plaster & teddy, with one of her freebies, called Simplicity. Each of which I applied different layer styles, opacities and some masks. See what you think of my first photo art creation...


Be sure and leave me a comment to let me know what you think!

Here is what the original image looks like:


Here are some of the textures I used on this image. You can see the texture collections here.

simplicity


plaster

teddy

I challenge you today to step outside of your creative box and try 
something new like I did. You may be pleasantly surprised with the results!